Devices - New UI
SECURITY Refer to SITES > Devices in Security Level Details - Permissions
SECURITY For device group actions, refer to ACCOUNT > Groups and SITES > Groups in Security Level Details - Permissions
NAVIGATION New UI > Devices > All
NAVIGATION New UI > Sites > click the name of a site or the number of devices next to a site name
About
Devices are the endpoints that are managed in your Datto RMM account. All devices are associated with a site. Refer to Sites. The Devices page displays all of your devices or a subset of your devices associated with one particular site, depending on which navigation path you chose to access the page.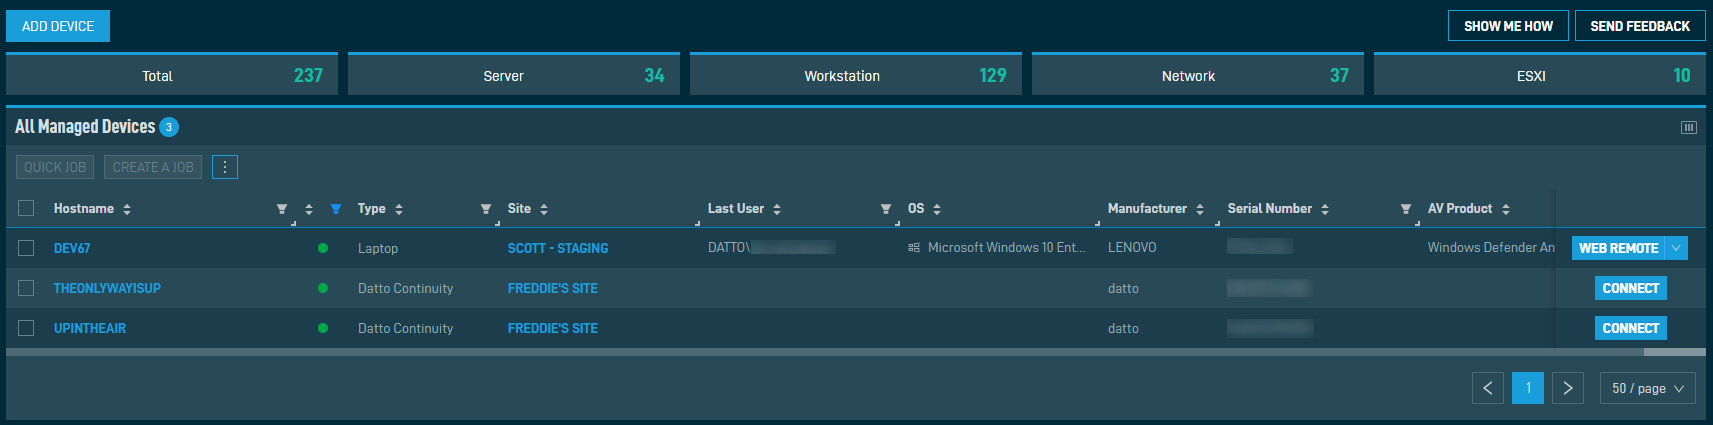
Click the Add Device action button at the top of the page. For more information, refer to Adding a device - New UI.
At the top of the page, click any of the following categories to filter the list by that device type:
| Category | Description |
|---|---|
| Total | Displays the total number of devices. This includes servers, workstations, mobile devices, network devices, printers, Datto Networking devices, Datto Continuity devices, and ESXi hosts. |
| Server | Displays the total number of servers. |
| Workstation | Displays the total number of laptops and desktops. |
| Network | Displays the total number of the following network device types: • Datto Access Point • Datto Managed Power • Datto Switch • Network Device (Other) • Network Device (Router) • Network Device (Switch) • Network Device (UPS) • Network Device (Firewall) • Network Device (IP Phone) • Network Device (NAS) • Network Device (Network Appliance) • Network Device (SAN) • Printer |
| ESXi | Displays the total number of ESXi hosts. |
The Column Chooser allows you to select which columns should be visible in the list. Refer to Column Chooser field definitions for descriptions of all of the available fields.
The columns are resizable.
The number of results displayed can be specified by selecting the desired number from the drop-down menu at the bottom of the table. This selection will persist the next time the page is accessed.
Various table actions are available.
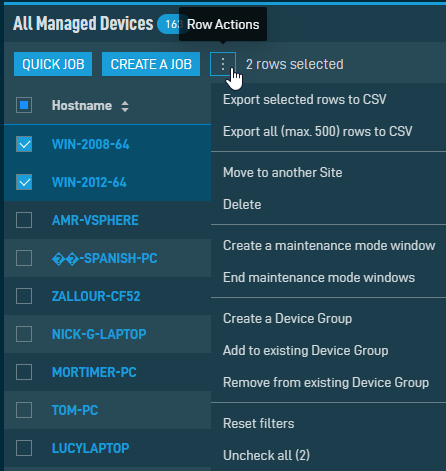
The action buttons are grayed out if no row is selected or if the action is not applicable to the selected rows. The selection box allows you to select one or more rows. Select all rows shown by checking the selection box in the table header. To access all action buttons, click the Row Actions icon at the end of the row. The table below lists all available action buttons.
| Action Button | Description |
|---|---|
| Quick Job | Refer to Quick jobs - New UI. |
| Create a Job | Refer to Scheduled jobs - New UI. |
| Export Selected Rows to CSV | In the confirmation dialog box, select whether to show table headers in the file by toggling the Show table headers in the exported CSV button. Select OK to download the file. Any column selections or filters that have been applied to the table will also be applied in the CSV file. A maximum number of 500 rows can be exported to a single CSV file. The Export All (Max. 500) Rows to CSV action is available without selecting any row in the table.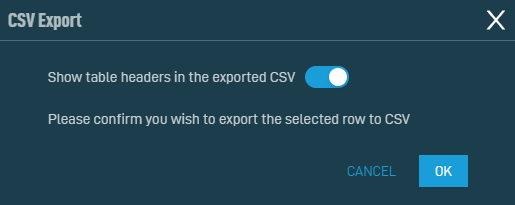 |
| Export All (Max. 500) Rows to CSV | |
| Move to Another Site | Refer to Move to Another Site. |
| Delete | Refer to Deleting a device - New UI. |
| Create a Maintenance Mode Window | Places the selected devices in an unscheduled maintenance mode that will prevent alerts from being generated for a specified time frame. Refer to Create a Maintenance Mode Window. |
| End Maintenance Mode Windows | Ends all (both unscheduled and scheduled) maintenance mode windows configured for the selected devices upon confirmation. For information about unscheduled maintenance mode, refer to Create a Maintenance Mode Window. For information about scheduled maintenance mode, refer to Maintenance policy. |
| Create a Device Group | Create a new group that includes the selected devices. Refer to Creating a group. |
| Add to Existing Device Group | Add the selected devices to an existing group. Enter the group name, then click Add, or click Cancel to return to the list of devices. NOTE If a Site Device Group is entered and any of the selected devices are not included in the site, a message will be displayed indicating that these devices cannot be added to the Site Device Group. NOTE The Add button will only become available once a group has been specified. |
| Remove from Existing Device Group | Remove the selected devices from a group. Enter the group name, then click Remove, or click Cancel to return to the list of devices. NOTE The Remove button will only become available once a group has been specified. |
| Reset Filters | Resets any of the filters applied in the table. |
| Uncheck All | Deselects all selected rows. The number of selected rows is indicated in parentheses and next to the Row Actions icon. |
Various remote support actions are available for online devices from any device list page. A user's security level permissions, the device's operating system, and the device type determine which actions are available. Hover over the V icon next to the remote support button to access all available actions.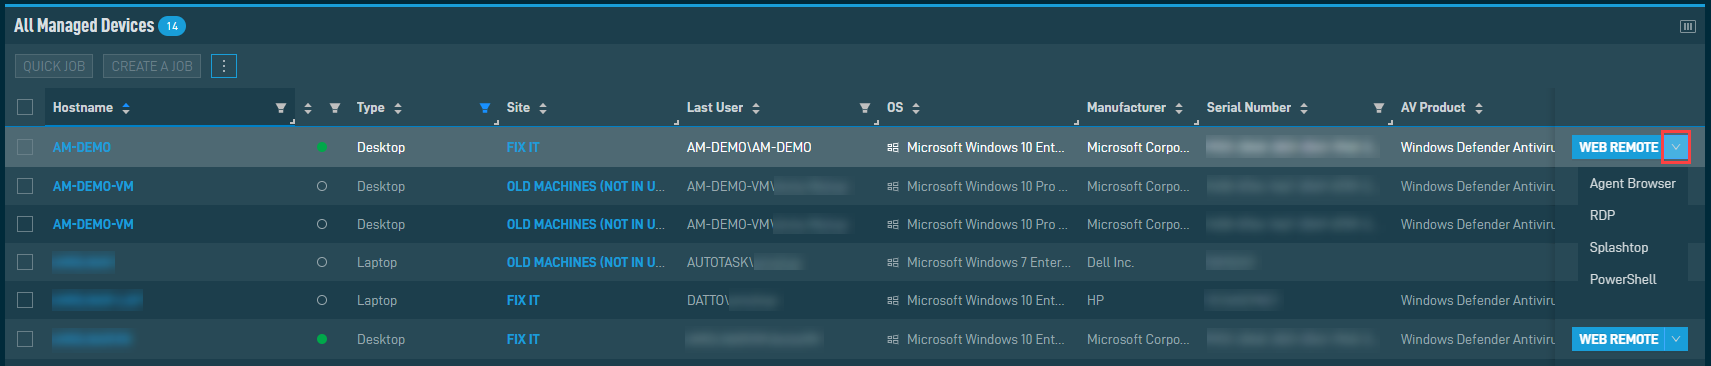
To learn more about each remote support action, refer to Action buttons.


