Account Settings
SECURITY Administrator
SECURITY Some settings are available to users with permission to manage Setup > Account Settings
NAVIGATION Setup > Account Settings
If you are the person who is responsible for implementing Datto RMM in your company, this guide will help you get your Datto RMM account up and running. There are a few fundamental account settings that you need to be aware of in order to get the most out of the functionality Datto RMM offers.
The correct permission to access Account Settings can be set up in Setup > Security Levels. For further information, refer to Security levels.
NOTE The settings described below apply to your entire Datto RMM account; however, they may be modified through Site Settings if applicable.
This area allows you to control access to your Datto RMM account. Turn the options ON or OFF as required or click Edit to update the Restricted IP List.
| Field | Definition |
|---|---|
| Enable API Access | Enables access to the Datto RMM API. By default, API access is disabled. Once it is enabled, API keys can be generated on the User Details page. Refer to Edit a user. |
| Require New Device Approval | If this option is enabled, any new device added to the account will need to be approved by the Administrator first. Only once they are approved, will it be possible to manage them through Datto RMM. By default, the option is disabled. For more information, refer to New device approval. If this feature is enabled and you disable it, all devices currently pending approval will immediately be authorized. |
| IP Address Restriction | Allows you to restrict access to the Web Portal for specific IP addresses. Once this option is turned on, your current IP address will automatically be added to the Restricted IP List. You can add more than one IP address to the list. |
| Agent IP Address Restriction | Allows you to restrict access to the Agent Browser for specific IP addresses. Once this option is turned on, your current IP address will automatically be added to the Restricted IP List. You can add more than one IP address to the list. |
| Restricted IP List | If you have enabled the IP Address Restriction and/or Agent IP Address Restriction options, enter one or more IP addresses to the Restricted IP List to ensure that the Web Portal and/or Agent Browser are only accessible through these IP addresses. Note: Your current IP address will automatically be added to this list once you turn on the IP Address Restriction or Agent IP Address Restriction option. If you would like to update the IP addresses or add new ones, click on Edit, make the changes, and click Save. |
You can specify the cost and power rating of your devices for the entire account. These numbers will provide the basis for your managed endpoints' energy usage calculation that you can view on the Managed sites' summary page. For more information, refer to Site Summary.
If the fields are left blank, the default wattage and cost per kWh will be applied.
The default wattage of 350W and the default cost can be changed by clicking on Edit.
NOTE The fields accept numeric values only.
| Field | Value |
|---|---|
| Desktop | Define the power rating of desktops, servers, laptops, or any other devices. The numbers set here can be overridden in Site Settings and on the Device Summary page. |
| Server | |
| Laptop | |
| Other | |
| Cost per kWh | Define the cost per kWh. This can be overridden in Site Settings. |
The formula to calculate the managed endpoints' energy usage calculation is as follows:
(UptimeInMinutes * Wattage) / 60 / 1000 * Price
Select a user with Administrator permission to be the default assigned resource for tickets. The resource set here can be overridden by a resource set at the site level. Refer to Site Settings.
IMPORTANT If No default user is selected, tickets will be assigned to the user who registered the account.
You can specify variables that can be used when writing custom scripts or components. The variables can be defined with a specific value that the Agent will use when executing the script. How you refer to the variables in your script will be defined by the scripting language you apply (e.g. in batch scripts, you can refer to a variable in the format of %VariableName%).
NOTE Account variables used in scripts or components will be passed to jobs and monitors but will be overridden by site variables of the same name. You can specify your site variables in the Variables section of Site Settings. You can also use the Update Site Variables template to update multiple sites' variables in bulk. Refer to the Update Site Variables section in this document.
To add an account variable:
- Click Add Variable.
- Enter a Variable Name. Make sure there is no space in the variable's name.
- Specify the Variable Value.
Maximum variable value: 65534 characters. - Check Mask my inputs if you would like to hide the variable's value.
- Click Add.
- Repeat steps 1-5 to add more variables.
You can configure 30 user-defined fields at account level that will be applied to the user defined-fields available on the Device Summary page in the current UI and the Device Summary - New UI page in the New UI. These fields can be populated with information that is not picked up in the device audit so that it can be filtered and searched to provide additional targeting for jobs and policies. You can enter the user-defined field information manually on the Device Summary page, or it can be populated by the Datto RMM Agent. For further information, refer to User-defined fields.
NOTE The user-defined fields defined here can be overridden at site level. Refer to Site Settings.
To configure the user-defined fields, do the following:
- Hover over one of the user-defined fields and click on the pencil icon to edit it.
- Rename the field under Account Label.
- Click on the green check mark
 to save the changes.
Custom Agent settings allow you to define how Agents communicate with the platform and perform network scans.
| Field | Definition |
|---|---|
| Use alternative settings for Agent | Select this to be able to configure further custom Agent settings. |
| Control Channel Address | By default, this field should be left blank. In case a specific Control Channel Address is needed for your account, please contact your Datto RMM Implementation Manager. |
| Control Channel Port | By default, this field should be left blank. In case a specific Control Channel Port is needed for your account, please contact your Datto RMM Implementation Manager. |
| Web Service Address | By default, this field should be left blank. In case a specific Web Service Address is needed for your account, please contact your Datto RMM Implementation Manager. |
| Tunnel Server Address | A tunnel server acts as an interface between devices for remote takeover sessions. Specify an IP / domain and a port to be used for the relayed connection by default (e.g. 123.45.6.789:443). Refer to Connecting Agents through the tunnel server grid. |
| Network Subnet Limit | Limits the size of the scan an Agent performs in a single subnet. By default, the limit is set to 65.534, which is also the maximum number of IP addresses that an Agent is able to scan in a sub-net. Set the value to 0 to disable network scanning for the entire account. Note: It is not possible to disable network scanning at site level. For further information, refer to Disable network scanning of SNMP devices. |
| Network Scan Limit | The limit of devices that the Agent can scan on the sub-net of the device. By default it is set to 1024. The minimum value is 0, while the maximum value is 2048. For more information about discovered devices, refer to Network discovery. |
To be able to deploy an Agent across a LAN, you will need to have a username and a password for the devices you want to install the Agent on. You can save these credentials so that you don't have to enter them when adding new devices. At the time of initiating Agent deployment, you will be prompted to select a set of credentials. Refer to LAN deployment from the Web Portal.
NOTE You can add Agent deployment credentials at site level as well. They will be used in addition to those specified here. For further information, refer to Site Settings.
- Click on Edit.
- In the Username field, enter the domain (if in use) and the username in the following format: Domain\Username.
- Enter the Password.
- To add further usernames and passwords, click on Add Agent Deployment credentials and repeat steps 2-3.
- Click Save.
NOTE To learn how to save Windows and SSH credentials in the New UI, refer to Windows credentials and SSH credentials.
If you would like to manage SNMP-enabled devices in Datto RMM, you can save their credentials so that you don't have to enter them when adding new devices. Cached SNMP credentials are also used during network discovery. For more information, refer to Managing and monitoring SNMP-enabled network devices and printers and Network scan process.
NOTE You can add SNMP credentials at the site level as well. They will be used in addition to those specified here. For further information, refer to Site Settings.
- Click on Edit to be able to add SNMP credentials.
- Choose the correct Version: v1, v2c, or v3.
- Fill in the details:
NOTE SNMP v1 and v2c only need a name and a community string; however, SNMP v3 requires more complex security. If you are not sure which settings to configure in Datto RMM to be able to connect to your network device over SNMP, refer to the SNMP device's documentation or provider for more details.
v1 and v2c
| Field | Description |
|---|---|
| Name | Enter the name of your device. |
| Community | The community string works as a password. If the field is left blank, the default read-only community string "public" is applied. If your device has a customized community string, enter it here. |
v3
| Field | Description |
|---|---|
| Name | Enter the name of your device. |
| V3 User | Enter a v3 username. |
| Authentication | Select an authentication protocol: • None • MD5 • SHA1 |
| V3 Password | Enter a v3 password. |
| Encryption | Select an encryption standard: • None • DES • AES128 |
| V3 Encryption Key | Enter a v3 encryption key. |
| Context | Enter the SNMP context ID to be able to access the correct device information. NOTE An SNMP context is a collection of management information, identified by a Context ID and a Context Name. (Source: The Internet Engineering Task Force) |
- To add more credentials, click on Add SNMP Credentials and repeat steps 2-3.
- Click Save.
NOTE To learn how to save SNMP credentials in the New UI, refer to SNMP credentials.
If you would like to manage ESXi devices in Datto RMM, you can save their credentials so that you don't have to enter them when adding new devices. For information about how to add ESXi devices, refer to Managing and monitoring ESXi devices.
NOTE You can add ESXi Credentials at site level as well. They will be used in addition to those specified here. For further information, refer to Site Settings.
- Click on Edit to be able to add ESXi credentials.
- Fill in the following details:
| Field | Description |
|---|---|
| Name | Enter the name of your device. |
| CIM Port | Enter the CIM port number. By default, it is set to 5989. The maximum value is 65534. |
| vSphere Username | Enter your vSphere username. |
| vSphere Port | Enter the vSphere port number. By default, it is set to 443. The maximum value is 65534. |
| vSphere Password | Enter your vSphere password. |
- To add more credentials, click on Add ESXi Credentials and repeat step 2.
- Click Save.
NOTE To learn how to save ESXi credentials in the New UI, refer to ESXi credentials.
NOTE This section is only available if you have downloaded the Splashtop Remote Screen Sharing extension from the ComStore. Refer to Splashtop Remote Screen Share Integration.
Once the extension has been downloaded, the Splashtop Settings section will be displayed. You can enable Splashtop functionality or disable it altogether by turning on the option Enable automatic installation of Splashtop Streamer. Once this is enabled, you can opt to automatically install it on all applicable machines without any administrative prompting. The inclusion and exclusion fields are present for configuring this feature.
For further information about the settings, refer to Splashtop Remote Screen Share Integration.
These settings only affect Windows devices. By default, Allow VNC is set to ON for all sites in the account.
When Allow VNC is set to ON, the VNC service will automatically be downloaded and installed as part of the Datto RMM Agent. You can apply the setting to all sites or selected sites by using the Include and Exclude buttons.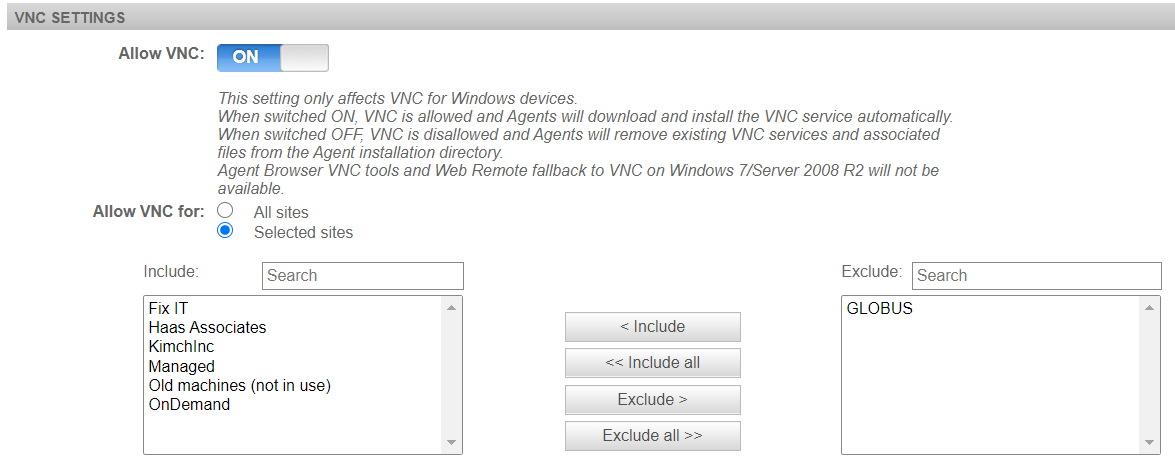
When the Allow VNC for selected sites option is used, VNC settings can also be changed in Site Settings. Refer to VNC.
When Allow VNC is set to OFF, the Agent will not download and install the VNC service on newly added devices, and it will remove the existing VNC service and associated files from the Agent installation directory on already existing devices. In addition, the Agent Browser VNC tool and Web Remote fallback to VNC on Windows 7/Windows Server 2008 R2 will not be available. Refer to VNC and Guest GPU Acceleration.
NOTE When the Datto RMM Agent is uninstalled from a device, only the Datto RMM implementation of VNC is removed. Other implementations of VNC will not be affected.
You can specify a From Name and a Reply-To Address for email notifications. Once these have been configured, the notification emails will come from the name specified and the replies will be delivered to the reply-to address.
- Click on Edit.
- In the From Name field, enter a name that you would like to appear in the from field of the emails sent out, for example, IT Support.
- In the Reply-To Address, enter an email address to which you want your recipient(s) to reply.
NOTE The email field only accepts the following characters:
a-z, A-Z, 0-9, @, and !#$%&'`*+-|/=?^_{}~.
- Click Save.
By clicking on Add Email Recipient, you can specify one or more email recipients and define what type of email notifications they should receive.
NOTE The user who registered the account is added as an email recipient by default, and all types of notifications are selected for this user by default.
Email recipients of a particular site can be specified in Site Settings.
- Click Add Email Recipient.
- Fill in the required fields.
| Field | Description |
|---|---|
| Recipient name | Enter the recipient's name. |
| Recipient address | Enter the recipient's email address. NOTE The email field only accepts the following characters: |
| Type | Select the preferred email format for this recipient: HTML, Text, or Both. |
| Receives | Select the types of notifications this recipient should receive: Alerts, Reports, ComStore Components, New Devices. NOTE Selecting ComStore Components will opt you into a Component Update Digest email notification. Refer to Check for updates. |
- Click Add.
You can update one or more of your Managed sites' existing variables or add new variables by uploading a .CSV file. In order for the update to be successful, the variable name and variable value fields are mandatory to fill in.
NOTE OnDemand sites cannot be updated with variables.
- Click on Download Template.
- Open the .CSV file you downloaded and fill in the details:
| Field | Description |
|---|---|
| Site ID | The Site ID (site identifier) is hard-coded and cannot be changed or updated. |
| Site Name | The name of your site. The name cannot be updated through the .CSV file; however, it can be changed in Site Settings. |
| Site Description | The description of your site. The description cannot be updated through the .CSV file; however, it can be changed in Site Settings. |
| Variable Name* | Enter the name of the variable. It can be a new variable or an already existing one. |
| Variable Value* | Enter the value of the variable. It can be a new value or an already existing one. Maximum variable value: 65534 characters. |
| Variable is Hidden | If you would like to mask the variable value, enter 1. If you would not like to mask the variable value, enter 0. Note: When adding a new variable and leaving this field blank, the variable value will not be masked. |
*Mandatory field.
- Save the file in .CSV format.
- Click on Choose file and select the file you have just saved.
- Click Save.
- The following message will appear in a yellow info bar at the top of the page: Site variables imported successfully.
- The variables will appear in the Variables section in Site Settings.
NOTE This section is only available if you have downloaded the Mobile Device Management (MDM) extension from the ComStore. Refer to Mobile device management.
IMPORTANT The Mobile Device Management (MDM) feature is no longer available for new implementations. MDM-related documentation in the Datto RMM Help only applies to partners who are already using this feature; however, Datto no longer offers support for issues with MDM. Please note that if the Mobile Device Management component is deleted from your Component Library, you will not be able to download it from the ComStore again. For further information regarding this change, please refer to this Community post.
For information on the Apple Push Certificate, refer to Set up the Apple Push Certificate.
If you have changed the column display at various places in your Datto RMM account, this option will allow you to restore the default column display for your entire account.
- Click Restore Defaults.
- Confirm your request by clicking OK in the pop-up window.
NOTE Restoring the default column display will apply to your user account only. It will not change other users' settings. Other users will need to restore the default column display for their own user account in Setup > Account Settings or on individual pages where they had previously changed the column display.


