Credentials - New UI
SECURITY Refer to SITES > Settings and SETUP > Account Settings in Security Level Details - Permissions.
NAVIGATION New UI > Setup > Credentials
About
You can manage various types of credentials on the Credentials page. This single page allows you to manage both global and site-level credentials, including view, create, edit, and delete functionality.
You can create and manage the following types of credentials in the New UI:
Creating credentials
On the Credentials page, click Create Credential and specify the details of the credentials.
Enter a name for the credentials.
NOTE The Name field has a limit of 255 characters.
Choose one of the following options:
-
Global: The credentials will apply to all sites in the Datto RMM account.
-
Site: The credentials will only apply to one site. Once this option is selected, enter a site name. The search results will be narrowed as you type.
Select the type of credentials you would like to create and configure their details.
To be able to deploy an Agent across a LAN, you will need to have a username and a password for the devices you want to install the Agent on. You can save these credentials so that you don't have to enter them when adding new devices. At the time of initiating Agent deployment, you will be prompted to select a set of credentials. Refer to LAN deployment from the Web Portal.
-
In the Username field, enter a username.
-
In the Password field, enter a password. The password is hidden as you type.
If you would like to manage ESXi devices in Datto RMM, you can save their credentials so that you don't have to enter them when adding new devices. For information about how to add ESXi devices, refer to Managing and monitoring ESXi devices.
Configure the following details:
| Field | Description |
|---|---|
| vSphere Username | Enter a vSphere username. |
| vSphere Password | Enter a vSphere password. The password is hidden as you type. |
| CIM Port | Enter the CIM port number. By default, it is set to 5989. The maximum value is 65534. |
| Port | Enter a port number. By default, it is set to 443. The maximum value is 65534. |
If you would like to manage SNMP-enabled devices in Datto RMM, you can save their credentials so that you don't have to enter them when adding new devices. Cached SNMP credentials are also used during network discovery. For more information, refer to Managing and monitoring SNMP-enabled network devices and printers and Network scan process.
-
Select one of the following versions: v1, v2c, or v3.
NOTE SNMP v1 and v2c only need a name and a community string; however, SNMP v3 requires more complex security. If you are not sure which settings to configure in Datto RMM to be able to connect to your network device over SNMP, refer to the SNMP device's documentation or provider for more details.
-
If you have selected v1 or v2c and your device has a customized community string, enter it into the Community field. The community string works as a password. If the field is left blank, the default read-only community string public is applied.
If you have selected v3, configure the following details:
| Field | Description |
|---|---|
| V3 User | Enter a v3 username. |
| Authentication | Select an authentication protocol: • None • MD5 • SHA1 |
| V3 Password | Enter a v3 password. The password is hidden as you type. If you have selected None in the Authentication section, this field becomes inactive. |
| Encryption | Select an encryption standard: • None • DES • AES128 |
| V3 Encryption Key | Enter a v3 encryption key. If you have selected None in the Encryption section, this field becomes inactive. |
| Context | Enter the SNMP context ID to be able to access the correct device information. NOTE An SNMP context is a collection of management information, identified by a Context ID and a Context Name (source: The Internet Engineering Task Force). |
To be able to deploy an Agent across a LAN, you will need to have a username and a password for the devices you want to install the Agent on. You can save these credentials so that you don't have to enter them when adding new devices. At the time of initiating Agent deployment, you will be prompted to select a set of credentials. Refer to LAN deployment from the Web Portal.
-
In the Username field, enter a username.
-
In the Password field, enter a password. The password is hidden as you type.
Click Create Credential to save the credentials or click Cancel to discard the changes.
Viewing and managing credentials
To see all global and site-level credentials configured in your Datto RMM account, navigate to the Credentials page. To see only one type of credentials, select a type at the top of the page. To see a list of credentials of only one site, enter a site name in the Filter by Site field above the All Credentials table. The search results will be narrowed as you type.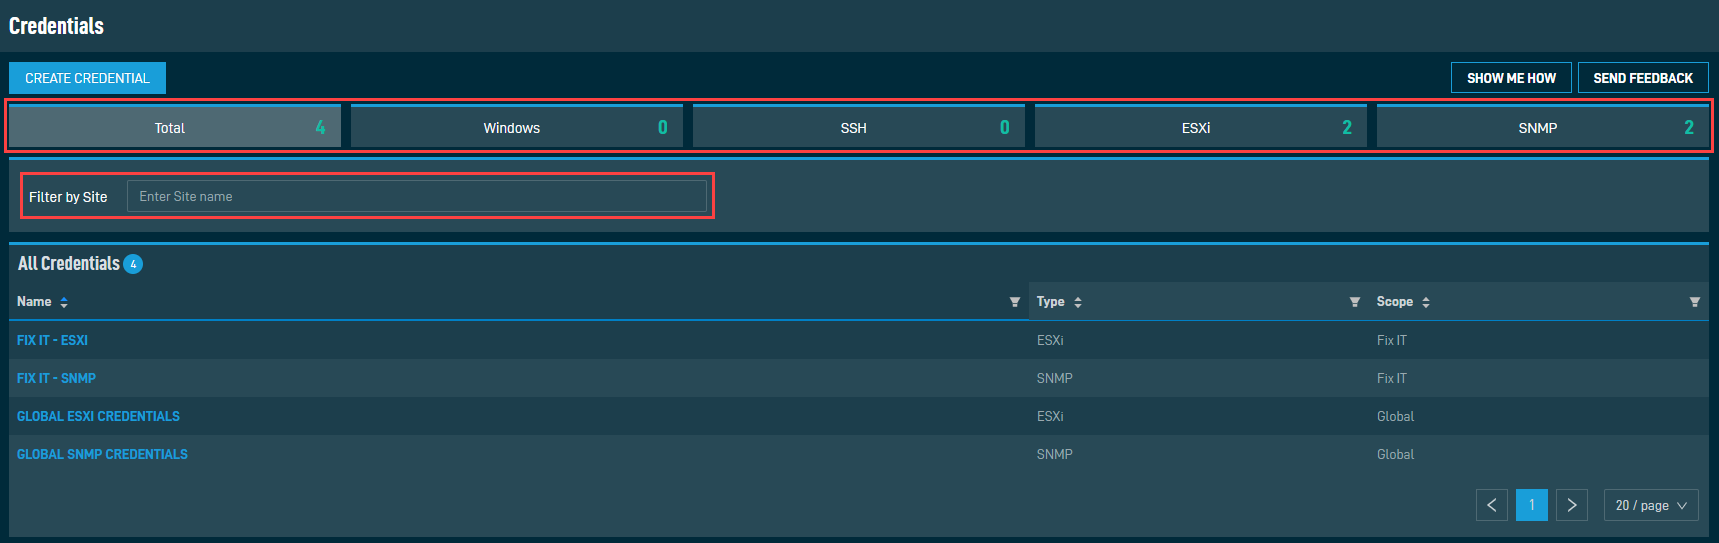
The table displays the following information:
| Field | Sortable? | Description |
|---|---|---|
| Name |
|
The name of the credentials. To narrow the list, click the Filter Menu icon, enter a term, and click Search. To see the full list, click Reset. Click the name of the credentials to edit them. Refer to Viewing and editing credentials. |
| Type |
|
Displays the type of the credentials. Refer to Type. To narrow the list, click the Filter Menu icon and select the types of credentials you want to see. Windows credentials and SSH credentials are listed under Deployment. |
| Scope |
|
This field indicates whether the credentials affect all sites or only one site in the Datto RMM account. Refer to Scope. To narrow the list, click the Filter Menu icon and click All, Global, or Site to filter by the scope of the credentials. |

The number of results displayed can be specified by selecting the desired number from the drop-down menu at the bottom of the table. This selection will persist the next time the page is accessed.
On the Credentials page, click the name of a set of credentials. The pane opening on the right-hand side displays all details of the credentials.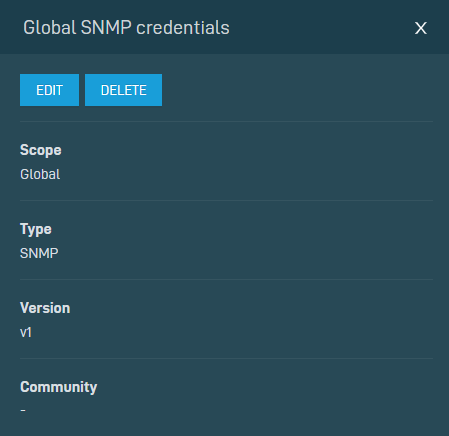
You can edit the credentials in the following ways:
-
To update the details of the credentials, click the Edit button. Refer to Creating credentials.
NOTE The Scope and Type of the credentials are not editable.
-
To delete, click the Delete button. Observe the warning dialog box that appears. Note that anything currently associated will be affected. Select the I understand that this action is irreversible check box to confirm the action and click the Delete button again.


