Single Alert View - New UI
SECURITY Refer to SITES > Monitor in Security Level Details - Permissions.
NAVIGATION New UI > Device Summary > Open Alerts card > click an alert message. To learn how to access the Device Summary page, refer to Device Summary - New UI.
NAVIGATION New UI > Dashboards > click an area of any alert widget to drill into a list of alert messages > click an alert message
About
An alert is the automatic response to a device operating outside of the parameters defined in a monitor. Refer to Create a monitor in the current UI or Creating a monitor in the New UI. The Single Alert View page features a clear structure to ensure that alert information is relevant, in context, and actionable. The title and overview areas provide at-a-glance information about the alert, with all alerts titled according to the semantic [Priority] [Category] Alert On [Device Name], mirroring the data presented in widgets on the Dashboards. In addition, use of color to communicate urgency as well as timestamps helps you quickly understand and take action on key information. All timestamps on the page reflect the time zone configured on the Setup > My Info tab. Refer to Time Zone.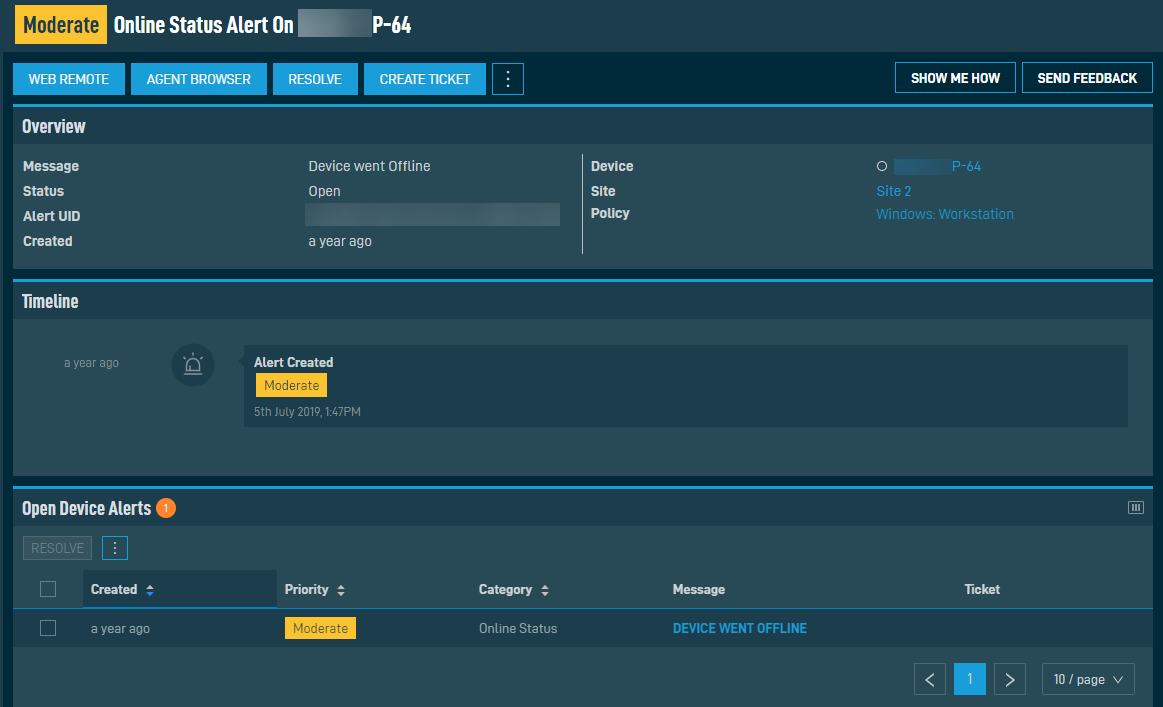
Action buttons
Different device types have different action buttons displayed at the top of the page. To access all action buttons, you may need to click the Alert Actions icon at the end of the row. The table below lists the available action buttons per device type. Further down, you will find information about each action button.
| Action Button | Server/Laptop/Desktop | Network Device | Printer | ESXi |
|---|---|---|---|---|
| Web Remote |

|
|||
| Agent Browser |
|
|
|
|
| Resolve |
|
|
|
|
| Create Ticket |
|
|
|
|
| Quick Job |
|
Only displayed for online devices and if the Web Remote option is turned ON in the Remote Control Tools section of your security level. Click the button to connect to the device using a Web Remote session. The session will open in a new browser tab.
IMPORTANT Web Remote sessions can be initiated from Windows, macOS, Linux, iOS, or Android devices using a recent version of the Chrome, Firefox, Edge, or Safari browser; no installed Agent is required. However, only Windows and macOS devices with an Agent installed can be controlled via a Web Remote session.
For Web Remote to function properly on macOS devices running Mojave or later, these applications must be listed and checked under System Preferences > Security & Privacy > Privacy in the following sections :
• Screen Recording: AEM Agent, Vine Server
• Accessibility: AEM Agent, Vine Server
• Full Disk Access: AEM Agent, Vine Server
File Transfer requires the Agent Process to be running using .NET Core.
For more information, refer to Web Remote.
Only displayed for online devices. Click the button to initiate a connection to the device using the Agent Browser. You will automatically be logged in to the Agent Browser. Once you are connected to the device, you will be presented with a list of actions you can perform on it. For further information, refer to Agent Browser tools.
IMPORTANT A connection through the Agent Browser can only be initiated from Windows devices with a Managed Agent installed. OnDemand Agents and operating systems other than Windows do not have an Agent Browser.
Click the button to resolve the alert. Once the alert is resolved, this action button will disappear, and an update will appear in the Timeline card. Refer to Timeline.
Only displayed if no ticket has yet been created for the alert. When displayed, it allows you to create a new ticket if you have a PSA Integration enabled. Once the ticket is created, the ticket number automatically appears in the Ticket field in the Overview card, the Ticket column in the Open Device Alerts card, and as an update in the Timeline card. Refer to Overview, Open Device Alerts, and Timeline for more details.
Click the button to run a quick job against the device. Refer to Quick jobs - New UI.
Overview
The Overview card for a single alert displays the following information: 
| Field | Description |
|---|---|
| Message | The contents of the alert message. |
| Status | The status of the alert: Open or Resolved. |
| Alert UID | The unique identifier for this alert. |
| Created | Displays when the alert was created. |
| Ticket | Displays a ticket number if the monitor was configured to create a ticket when an alert is raised. Refer to Create a monitor in the current UI or Creating a monitor in the New UI. If a PSA Integration is enabled and you click the ticket number, the ticket will open in a new window in your PSA. If you are already logged into your PSA or single sign-on is configured for you, you will be directed to the ticket. If you are not logged into your PSA, you will be required to enter your login credentials first. Refer to Managing tickets. |
| Device | The hostname of the device that triggered the alert. Click the device name to open the Device Summary - New UI page. You may see the following visual indicators next to the device name: • The device is online (green circle) or offline (transparent circle). • The device has Privacy Mode enabled. |
| Site | The name of the site associated with the device that triggered the alert. Click the site name to open the Site Summary page. |
| Policy | The name of the policy associated with the device that triggered the alert. Click the policy name to see the policy details. Refer to Editing a policy. |
Timeline
The Timeline card displays a list of events associated with the alert in chronological order.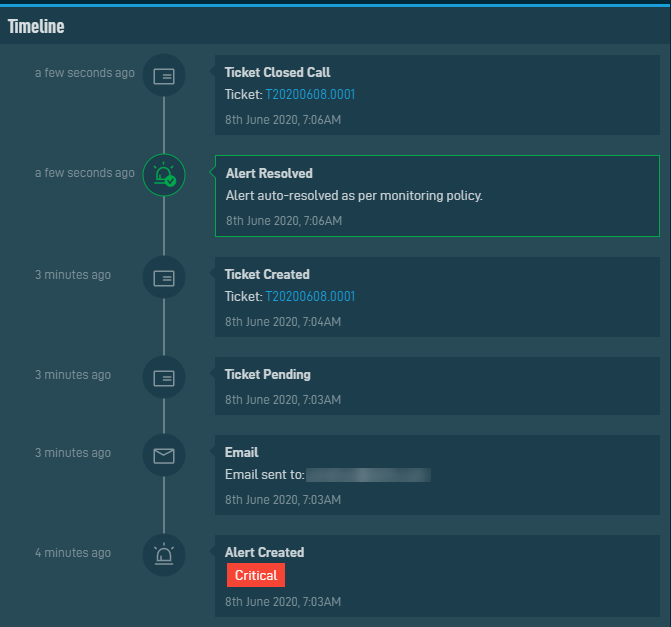
The following information is displayed:
| Field | Description |
|---|---|
| When? | Displays how long ago the event occurred. |
| Event type | The card can display the following events: • Alert created • Diagnostic information • Response component run • Email created • Ticket pending/created • Alert resolved • Ticket closed |
| Event details | Displays the name and various details of the event, such as the date, time, ticket number (if applicable), and recipient email address. Successful events are highlighted in green, while failed events are highlighted in red. |
Open Device Alerts
The Open Alerts card displays a list of the device's open alerts. The card header has a badge showing the number of alerts, and the color of the badge matches the color of the highest priority alert in the list.
The single alert you are currently viewing is highlighted in the list.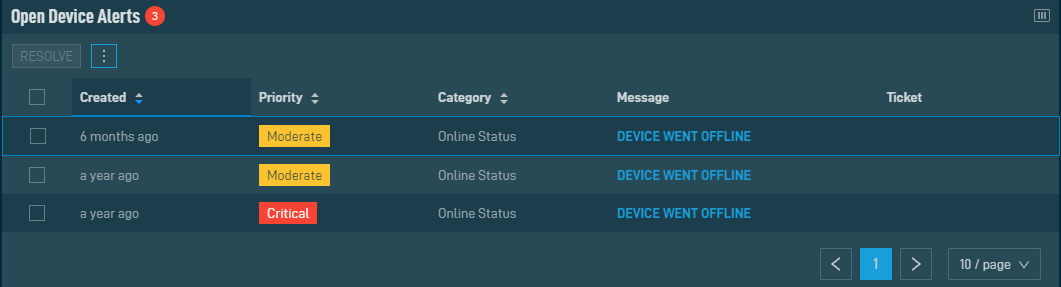
This card adds context to the single alert details displayed in the Overview card. While some alerts are isolated incidents, some are part of a wider issue affecting the device, and viewing all of this information in one place allows you to decrease troubleshooting time. From this list, you can resolve the single alert, or you can resolve multiple related alerts all at once. You can also export all or selected rows to CSV. Refer to Open Alerts.
The Column Chooser allows you to select which columns should be visible in the list. Refer to Column Chooser field definitions for descriptions of all of the available fields.
The number of results displayed can be specified by selecting the desired number from the drop-down menu at the bottom of the table. This selection will persist the next time the page is accessed.


