Agent Browser
SECURITY All users unless the Datto RMM icon is hidden or the Agent Browser mode is disabled. Refer to Create an Agent policy in the current UI and Agent policy in the New UI.
NAVIGATION Double-click on the Datto RMM icon in the taskbar notification area
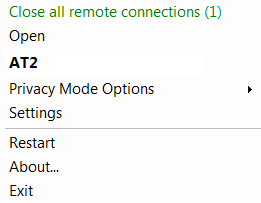
NAVIGATION Right-click on the Datto RMM icon in the taskbar notification area > click Open
NAVIGATION Click the Start menu > All Programs > CentraStage > Agent Browser
IMPORTANT The Agent Browser is only available for Managed Agents on Microsoft Windows devices. OnDemand Agents and operating systems other than Windows do not have an Agent Browser.
The Datto RMM Agent Browser is launched from the Agent or the Web Portal. The Agent Browser offers multiple tools to open a remote takeover session on the endpoint or execute tasks on it, and it allows you to connect to more than one device at the same time.
While the Agent Browser is only available for Managed Agents on Microsoft Windows devices, the Agent Browser can connect to Managed and OnDemand devices, on Windows, macOS, and Linux operating systems, with varying options available to each. You can also initiate a browser connection, a direct connection, or a custom tunnel connection to devices managed by a Network Node device. Refer to List of Agent Browser tools.
NOTE In order to establish a connection between two devices, both the device you are connecting from and the device you are connecting to needs to have an Agent installed. If you would like to connect to a device that cannot have an Agent installed, the Agent Browser will use a Network Node to establish the connection. For information about devices and deployment options, refer to Devices.
How to...
IMPORTANT The Agent Browser is only available for Managed Agents on Microsoft Windows devices. OnDemand Agents and operating systems other than Windows do not have an Agent Browser.
NOTE Access to the Agent Browser and the available options may be specified in an Agent policy. For further information, refer to Create an Agent policy in the current UI and Agent policy in the New UI.
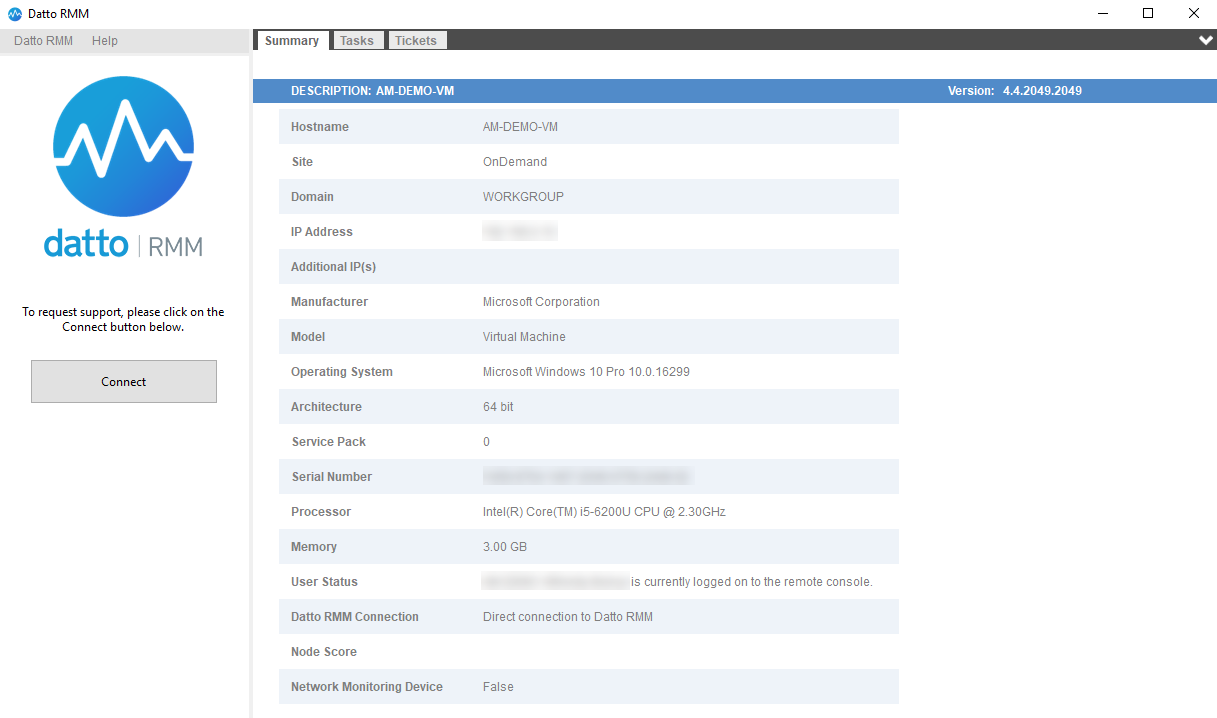
- Open the Agent through any of the paths indicated above. The following window opens:

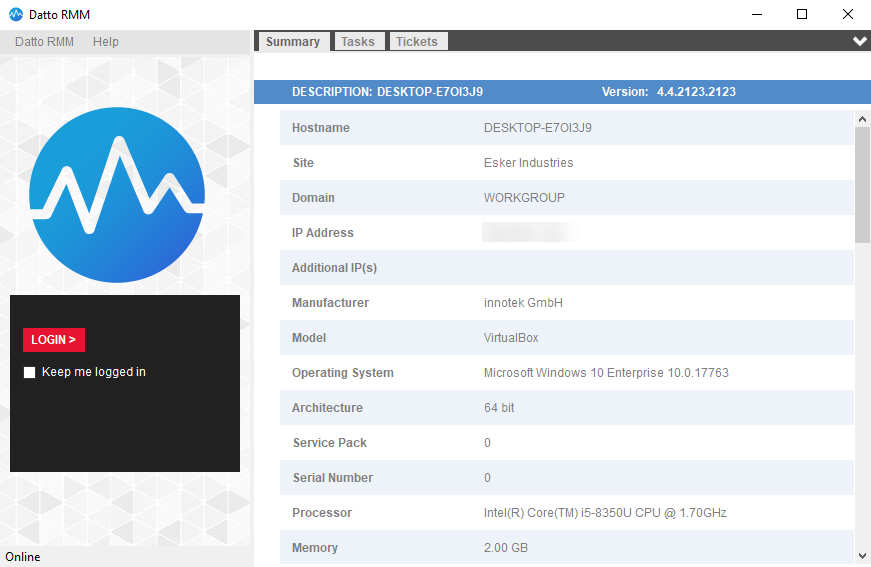
- The following tabs are displayed on the right pane along with a few basic details about the device:
| Tab name | Description |
|---|---|
| Summary | Displays the Agent version installed on your own device and basic information including hostname, site name, domain, IP address, and more. |
| Tasks | Allows you to run components on your device if the components are enabled as User Tasks in the Web Portal. For further information, refer to User Tasks. |
| Tickets | Allows you to create a ticket. For more information, refer to Agent ticketing for end users. |
- The left pane allows you to log into the Agent Browser. Click Login.
NOTE You may see a different logo and text in this window. For information on how to apply custom Agent branding, refer to Branding in the current UI and Branding - New UI in the New UI.
- Select the check box Keep me logged in if you would like the Agent Browser to remember your login credentials.
NOTE The credentials will be saved until the Datto RMM Agent or the computer is restarted but for no longer than 8 hours. You will always be logged out after 8 hours of inactivity.
- The Login page opens in your web browser. Refer to Logging in.
- Observe the following screen once you have logged in.

NOTE The Login page is also where you can reset your password if necessary. Refer to Reset your password.
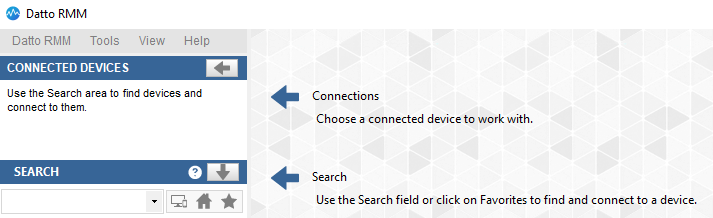
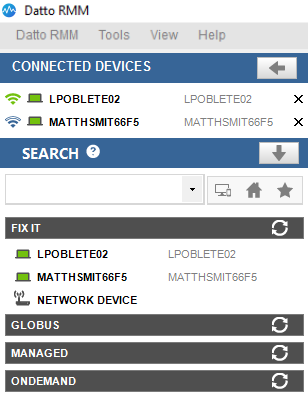
You will see the following areas on the page:
| Field | Description |
|---|---|
| Logo | The desktop shortcut of the Agent Browser. To learn how to add your own desktop shortcut logo, refer to Branding in the current UI and Branding - New UI in the New UI. |
Product Name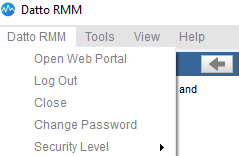 |
Displayed next to the desktop shortcut logo and as the first menu in the menu bar. For information on how to customize the product name, refer to Branding in the current UI and Branding - New UI in the New UI. Click on the product name and you will be presented with the following options: • Open Web Portal - Opens the Web Portal in a new window. It will prompt you to log in if you were not logged in before. • Log Out - Logs you out of the Agent Browser. You'll be redirected to the login page. • Close - Closes the Agent Browser window. It will also log you out unless you have the Keep me logged in option enabled on the Agent Browser login pane. • Change Password - Opens the Web Portal in a new window where you can access your Security Settings. It will prompt you to log in if you were not logged in before. For information on how to change your password, refer to Reset your password. • Security Level - Allows you to change your security level that you are using in the Agent Browser. For further information, refer to Switch security levels. |
| Tools | A list of the available Agent Browser tools. They become active once you are connected to a device. For further information, refer to Agent Browser tools. |
View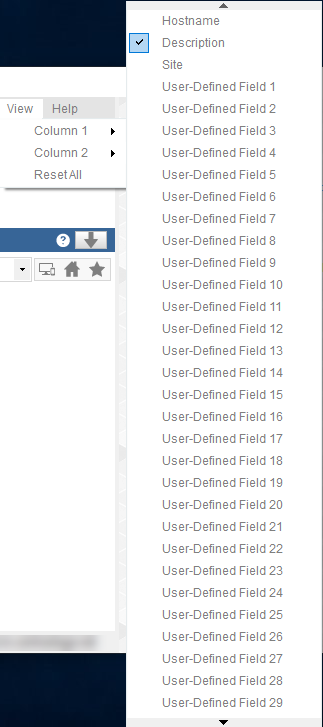 |
Allows you to specify what information you would like to see about the devices in the Connected Devices area and the Search results. Click View and you will see that, by default, Column 1 displays the Hostname of the device and Column 2 displays the Description of the device. You can change the default information by choosing any of the following options: • Hostname • Description • Site • User-Defined Fields 1 - 30 • Last User • Reset All - Resets the default values. For further information about the fields, refer to Device lists. EXAMPLE Example of Column 1 showing the Hostname of the device and Column 2 showing the Description of the device. |
| Help | Click Help > About to see the following information: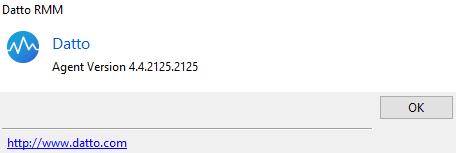 • Product name • Desktop shortcut • Company name • Agent version For information on how to update the information in this window, refer to Branding in the current UI and Branding - New UI in the New UI. |
Connected Devices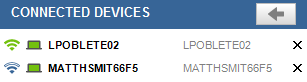 |
The list of devices you are connected to. You can connect to multiple devices at the same time. Use the Search area to find devices and connect to them. For information on how to connect to a device, refer to Connect to a device. |
Search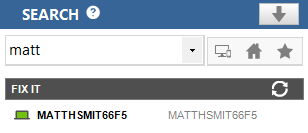 |
Use this area to find devices and connect to them. The search results will display your devices under their respective site. •  - Search for specific devices by entering their hostname, description, serial number, IP address or last user and clicking on the icon. If you don't specify your device and click on the icon, it will populate all your devices. - Search for specific devices by entering their hostname, description, serial number, IP address or last user and clicking on the icon. If you don't specify your device and click on the icon, it will populate all your devices.•  - Search for a site by entering a specific site name, or leave the search field blank and click on the icon to populate all the sites. - Search for a site by entering a specific site name, or leave the search field blank and click on the icon to populate all the sites. •  - Search for a favorite device by entering its hostname, description, serial number, IP address or last user, or leave the search field blank and click on the icon to populate all your favorite devices. - Search for a favorite device by entering its hostname, description, serial number, IP address or last user, or leave the search field blank and click on the icon to populate all your favorite devices.NOTE Hover over the question mark  next to the site name to refresh the list of results. For information on how to connect to the device you have located, refer to Connect to a device. next to the site name to refresh the list of results. For information on how to connect to the device you have located, refer to Connect to a device.NOTE The device you are connecting from will not be displayed in the search results. NOTE Datto Networking and Datto Continuity devices will not be displayed in the search results. |
| User, platform | In the bottom left of the Agent Browser window, you can see the name of the logged in user and the platform URL. For further information about the Datto RMM platforms, refer to Datto RMM platforms. |
 next to Search and over the icons next to the search field for tips on how to best target your search.
Once you have logged into the Agent Browser, you can use the Search area to find devices that you would like to connect to. For further information, refer to Search. The search results will display online devices first. Offline devices can be identified by an offline icon.
NOTE You can specify in the Agent Browser settings if you want to see offline devices when performing a search. For more information, refer to Configure the Agent and Agent Browser.
You will be able to search for and see any device that is added to your Datto RMM site, however, you will only be able to connect to online devices. Managed devices allow unattended remote connection, that is, unless Privacy Mode is enabled, you do not need the end user's permission to establish a connection to a Managed device. However, you can only connect to an OnDemand device if the end user requests the connection.
NOTE The ability to remote into the same endpoint (the device you are connecting from) is not supported.
NOTE To learn how to connect to a Managed device through the Web Portal, refer to Remote Actions.
- Once you have logged into the Agent Browser, search for the device you would like to connect to. Refer to Search.
- Click on the device.
- If Privacy Mode is enabled on the remote device, the end user will receive a notification that you would like to connect to their device. The notification will stay on their screen for three minutes, and they can accept or decline the request. For more information, refer to Privacy Mode and Create an Agent policy in the current UI and Agent policy in the New UI.

- Once the connection has been established, the device will appear in the Connected Devices section.
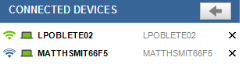
NOTE If a peer-to-peer (P2P) connection fails to be established at the start of a connection, all communication between devices will traverse the tunnel servers. A peer-to-peer connection is identified by green bars  , a relayed connection via a tunnel server is identified by blue bars
  in front of the device. For more information, refer to Connecting Agents through the tunnel server grid.
NOTE Unless you have connected to a device with Privacy Mode enabled (and not modified through an Agent policy), or initiate a remote takeover session through one of the Remote takeover tools, the end user will not be aware that you are connected to their device.
NOTE In case you lose the connection to a device, you can have the Agent Browser auto re-connect to it. Go to Settings > Preferences and select Auto re-connect to disconnected devices. For more information, refer to Configure the Agent and Agent Browser.
- Click on the device in the Connected Devices section to be able to use the Agent Browser tools.
- To close the connection to the device, hover over it in the Connected Devices area, and click the X at the end of the row. For more information, refer to Disconnect from a device.
OnDemand Agents appear offline, unless the end user requests a connection to the device. Once the connection request is received, you (the technician or Administrator) can initiate the connection.
- Advise the end user to open the Agent on their device through any of the paths indicated above.
- The following window will open:
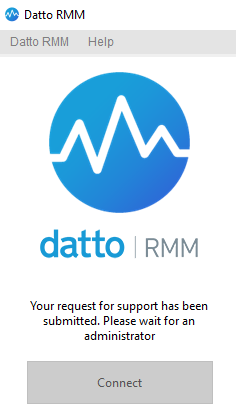
- Advise the end user to click on the Connect button in the left pane.
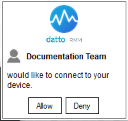
- Once the request has been submitted, the end user will get the following message:

NOTE The logo and text may be customized. Refer to Branding in the current UI and Branding - New UI in the New UI.
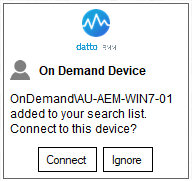
- Once the end user has submitted the request for support, the device will appear online and you will see the following notification in the Agent Browser:

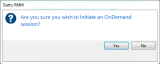
- Click Connect. Alternatively, you can use the Search area in your Agent Browser to find the device and connect to it. Refer to Search.
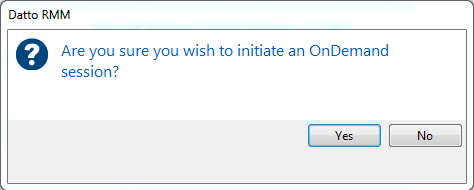
- A pop-up window will open. Click Yes to initiate an OnDemand session.
- If Privacy Mode is enabled on the remote device, the end user will receive a notification that you would like to connect to their device. The notification will stay on their screen for three minutes, and they can accept or decline the request. For more information, refer to Privacy Mode and Create an Agent policy in the current UI and Agent policy in the New UI.
- Once the connection has been established, the device will appear in the Connected Devices section, and you can use any of the Agent Browser tools available, just like in a Managed session. Refer to Agent Browser tools.
- To close the connection to the device, hover over it in the Connected Devices area, and click the X at the end of the row. For more information, refer to Disconnect from a device.
NOTE The OnDemand device will appear offline again one hour after the connection has been closed.
Certain devices (network devices, printers, ESXi devices) are managed without the use of an Agent and are instead managed indirectly through a Network Node. Refer to Network discovery.
Once these devices have been added, they can be connected to by following these steps:
- Once you have logged into the Agent Browser, search for the device you would like to connect to. Refer to Search.
- Click on the device.
- The device will appear in the Connected Devices section.
- Click on the device in the Connected Devices section to be able to use the Agent Browser tools.
Some firewalls may intermittently (usually between 30 and 60 seconds) disconnect you from your connected device whilst in peer-to-peer mode . To resolve this issue and bypass peer-to-peer connection to Windows and macOS devices, Datto RMM offers a way of forcing the remote connection to be handled through a tunnel server. This is called Forced Relay mode.
You have two options to force a relayed connection:
Through the Agent settings
This method disables peer-to-peer connections altogether.
- To access the Agent settings, refer to Configure the Agent and Agent Browser.
- In Preferences, check the option Don't use P2P connections when connecting to remote devices.
Once this setting is configured, any device you connect to will appear in the Connected Devices area with blue bars next to it to indicate a relayed connection.
Manually
With this method, you can disable peer-to-peer connections on a one-by-one basis.
- Make sure you close all remote connections in the Agent Browser. To do that, click the X next to your devices in the Connected Devices area and once you have disconnected from all the devices, right-click on the Datto RMM icon in the taskbar notification area and click Close all remote connections.

- Once all the connections are closed, search for the device you wish to connect to.
- BEFORE clicking to connect to the device, hold down the Shift key on the keyboard.
- Whilst holding down the Shift key, click on the device to connect. The device will now appear in the Connected Devices area with blue bars next to it to indicate a relayed connection.
When you are connected to a device, you can execute a variety of tasks on it. For information about remote device task options, refer to Agent Browser tools.
- To close the connection to a device, hover over it in the Connected Devices area, and click the X at the end of the row.
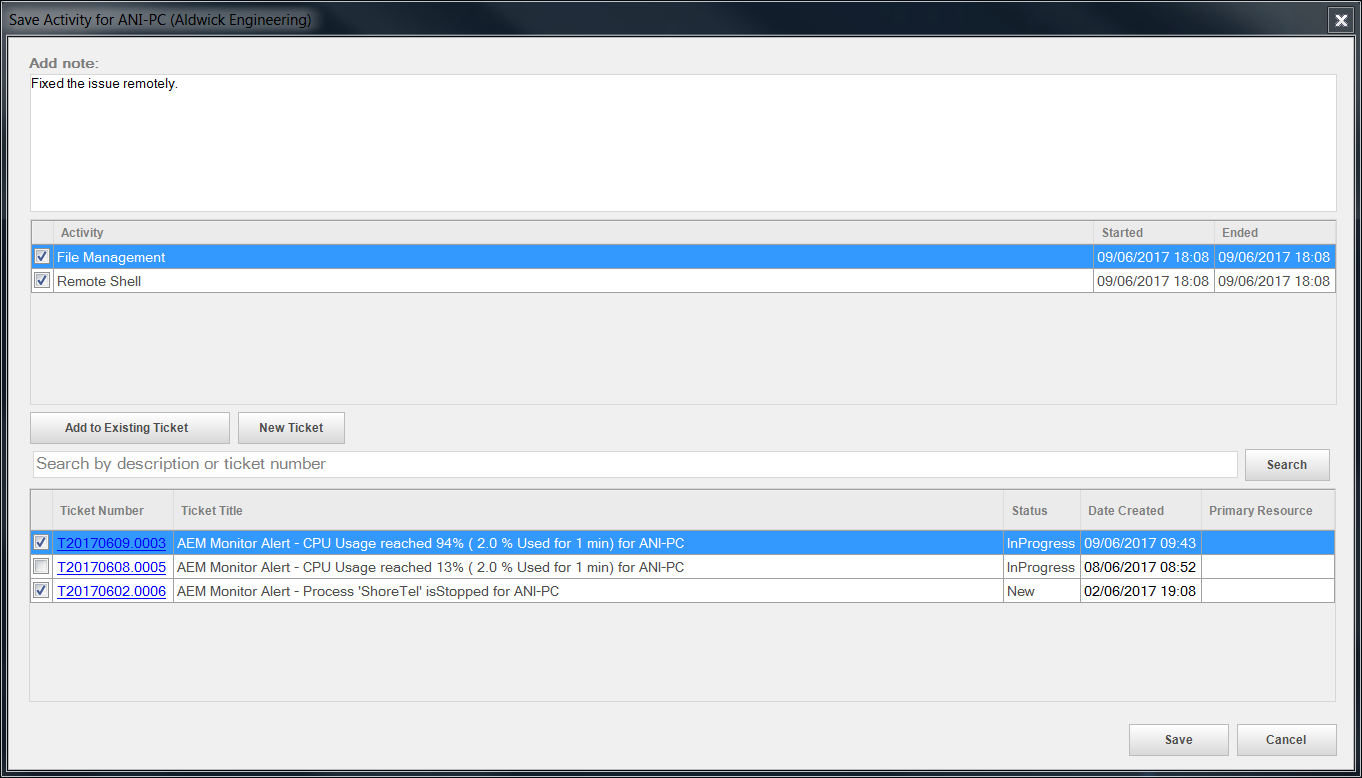
- If your Datto RMM account is integrated with Autotask PSA, the following window will appear:
| Field | Description |
|---|---|
| Add note | Add a summary about the remote session. |
| Activity | Displays the activities carried out during the remote session, with a start and an end date. Select any of the activities that you would like to add to an Autotask PSA ticket. NOTE SNMP Test Tool activities will not be added to the Autotask PSA ticket. |
| Add to Existing Ticket | Click this button to add the selected activities to an already existing PSA ticket as an internal note. A ticket list will be loaded. Only tickets created by the Agent are retrieved. The list will show PSA tickets that are not older than 7 days and have a status other than "Complete" for the device you connected to. You can refine this list by performing a search by description or ticket number in the search bar and clicking the Search button. You can also search without any description or ticket number, just by clicking the Search button. In this case, the list will show PSA tickets that are not older than 7 days and have a status other than "Complete" for the site that the device you connected to belongs to. Select one or more tickets that you want to add the activities to. The following information is displayed about the tickets: • Ticket Number - Click the ticket number to view the ticket in Autotask PSA in a new window. If you were already logged into PSA or single sign-on is configured for you, you will be directed to the Ticket Detail page. If you are not logged into PSA, you will be required to enter your login credentials first. • Ticket Title • Status • Date Created • Primary Resource |
| New Ticket | Click this button to add the selected activities to a new PSA ticket. A pop-up window will open and the Ticket Title and Description will automatically be filled in. The Description will contain all of the activities carried out during the remote session. If your Datto RMM user account is mapped to a resource in PSA and both emails match, the resource is assigned. If your Datto RMM user account is not mapped to a resource in PSA, no resource will be assigned. Click OK to save the ticket or Cancel to stop the action. |
| Save | Click Save to save your selections. |
| Cancel | Click Cancel to stop the action. |
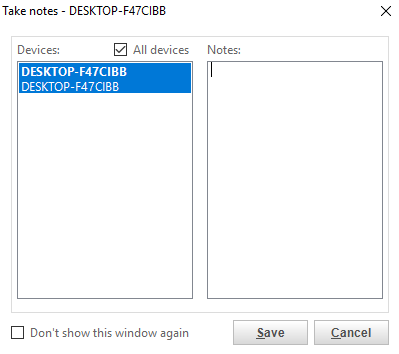
- If your Datto RMM account is not integrated with Autotask PSA, the following window will appear:

| Field | Description |
|---|---|
| Devices | The name and description of the device you connected to. |
| Notes | Add a summary about the remote session. |
| Don't show this window again | Select this check box if you would not like this window to pop up in the future. |
| Save | Click Save to add your notes. They will appear on the Device Summary page in the current UI and on the Device Summary - New UI page in the New UI. NOTE You can also enter a note while you are connected to a device. Refer to Agent Browser tools. |
| Cancel | Click Cancel to stop the action. |
- The device will no longer be listed in the Connected Devices area. If you would not like to enter activity or notes when closing a device, you can update your preferences. Refer to Configure the Agent and Agent Browser.
- To make sure you have closed all remote connections, right-click on the Datto RMM icon in the taskbar notification area and click Close all remote connections.
The Agent Browser settings can be configured through the Datto RMM Agent. For more information, refer to Configure the Agent and Agent Browser.


