Create a Patch Management policy
SECURITY Refer to Permissions.
NAVIGATION Account > Policies
NAVIGATION Sites > select a site > Policies
VIDEO Datto RMM: Patch Management Best Practices
Datto RMM technical experts Jon North and Aaron Engels explain why Patch Management is such a critical business offering. They cover what Windows updates and Patch Management look like in 2019 and beyond, with Cumulative Updates and Windows as a Service. They explain how you can leverage Datto RMM in the most efficient way for your business and offer their best practices suggestions to improve your current patching and updating strategies. Also refer to the Windows 7 to Windows 10 webinar recording to learn how you can control Feature Updates for Windows 10 with Datto RMM.
What is a patch management policy?
With a patch management policy, you are pre-approving patches to be installed on your Windows devices on an ongoing basis, based on conditions you define. A patch management policy can not only manage the patches made available in Windows Update, but it also gives you much more control, lowers your workload, and increases the security of your device estate.
You can set up an account-level or site-level policy that can target multiple devices, define the patch window, patch location, automatic approval rules, and special options such as reboot behavior. You can also create a patch management policy for audit purposes only. You can even apply site-level overriding of account-level patch policy options.
NOTE We recommend that you create at least two patch policies: one for workstations and one for servers.
IMPORTANT Only Windows Managed Agents support patch management. Refer to Managed and OnDemand Agents.
For more information on patch management, refer to Patch Management.
All new accounts are provisioned with a default Patch Management policy that can be found in Account > Policies and is configured the following way: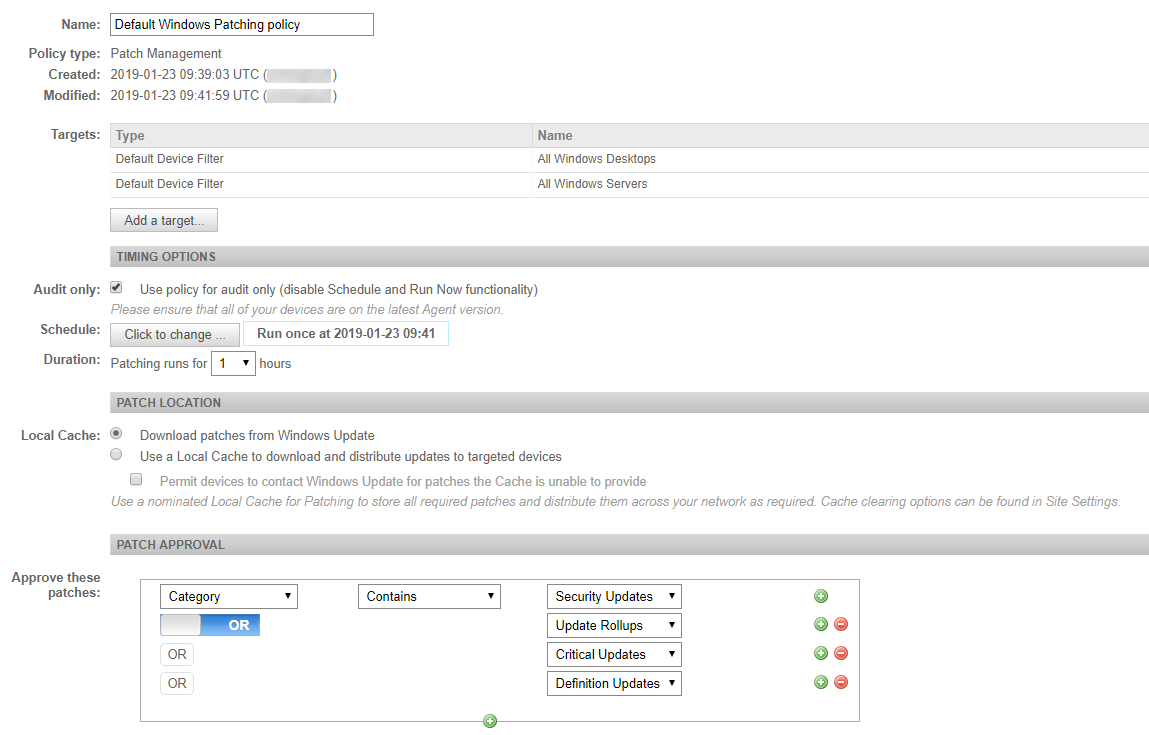
| Field | Definition |
|---|---|
| Name | Default Windows Patching policy |
| Policy Type | Patch Management |
| Targets | • Default Device Filter - All Windows Desktops • Default Device Filter - All Windows Servers |
| Timing Options | Audit only |
| Patch Location | Download patches from Windows Update NOTE Although this is option is selected, patches will not be downloaded and run on the targeted devices as the policy is configured to be Audit only. |
| Patch Approval | Approve these patches: • Category > Contains > Security Updates OR Update Rollups OR Critical Updates OR Definition Updates |
You can create another Patch Management policy or modify the default one. For more information, refer to Specify the policy details for a patch management policy.
How to...
- If you would like to use a patch management policy to install only the patches you have approved, you need to disable Automatic Windows Update on your devices. We recommend that you create a Windows Update Policy in Datto RMM to achieve this. For more information, refer to the Disable automatic Windows Updates section in Create a Windows Update policy.
- You can then create a patch management policy at the account or site level. Refer to Specify the policy details for a patch management policy.
Account-level policies can be overridden at the site level to alter only the most necessary elements for a smaller subset of devices. For more information, refer to Override account-level patch policy options at the site level.
NOTE A Default Patch Management policy is available in all new accounts. To modify the policy details or create a new policy, refer to the steps below.
- On the Policy page, click New account policy... or New site policy...
- Give the policy a Name.
- Select the type Patch Management.
-
To copy an already existing policy to use it as a template, choose it from the Based on drop-down list. To create a new policy, select New Policy.
NOTE You can only use an account-level or site-level policy as a template, that is, you cannot base your policy on a site-level override of an account-level policy. For information of site-level overrides, refer to Override account-level patch policy options at the site level.
- Click Next.
-
Click Add a target... to target your devices through a specific filter or group.

If you want to target more than one filter or group, add another target to the policy. Multiple targets will apply the "OR" logic, that is, the policy will be run on a device if it is included in any of the targets. For more information about target types, refer to Filters and Groups.NOTE Filters will present you with a list of the device filters that are available in every account and any custom filters you've created yourself. Devices of Unknown device type will not be targeted by the policy.

- Choose one or more of the following options:
| TIMING OPTIONS | |
|---|---|
| Field | Description |
| Audit only | Select this option to use the policy for audit purposes only. This will allow you to see missing patches on your devices without the ability to (accidentally) run the policy on them. Once this option is selected, it will disable the Schedule and Duration options below, and the Run Now functionality. For more information on Run Now, refer to Patch management at the account and site level and Patch management at the device level. |
| Schedule |
IMPORTANT Ensure that all of your devices are on the latest Agent version. NOTE This option will be grayed out if the Audit only option has been selected. Click the Click to change... button to set the schedule when you want the policy to run. Select one of the following:• At selected date and time - Defaults to the current date and time, but can be changed in the Start field. The policy will run once at the selected date and time. • Daily - The policy will run every day at the time indicated in the Start field. • Weekly - The policy will run every week on all selected days at the time indicated in the Start field. • Monthly - The policy will run in the selected months on the selected days. • Monthly day of week - The policy will run in the selected months on the specified occurrence of the selected days of the week. • Yearly - The job will run on the selected day (1 - 366) each year. Once you click OK, the selected schedule will be displayed next to the Click to change... button. NOTE Time zones will be taken into account at run times. For example, if the policy is set to run at midnight and is applied to two devices in different time zones, one UTC and one PST, then the policy will run at midnight UTC on the UTC device and at midnight PST on the PST device. |
| Duration |
NOTE This option will be grayed out if the Audit only option has been selected. Allows you to put a time limit (1-24 hours) on running the policy. If this time window is overrun, the targeted device will stop installing patches once the current operation has completed.EXAMPLE If patches 1-10 should be installed on a device but the set time limit is reached while the installation of patch 6 is still in progress, patch 6 will be installed on the device but patch 7 will not. Patch 7 will resume during the next scheduled policy run. NOTE You can run patch management policies outside of schedule on individual devices. For more information, refer to Patch management at the device level. |
| PATCH LOCATION | |
| Field | Description |
| Local Cache | The following options are available: • Download patches from Windows Update - The targeted devices will contact Windows Update directly to download patches. • Use a Local Cache to download and distribute updates to targeted devices if available - The targeted devices will contact the local patch cache(s) of their sites for updates if a patch cache has been configured. If no patch cache is available, the targeted devices will always be permitted to contact Windows Update to obtain patch data. If you want to use the Local Cache option in your policy, make sure that the sites your targeted devices reside in do have a nominated patch cache. To learn more, refer to Designate a local cache. To learn about patch cache clearing options, refer to Site Settings. IMPORTANT Since 2019, Microsoft has changed the method for delivering Windows-as-a-Service-based Windows updates. Devices affected by these changes cannot receive their updates from a patch cache and must download updates directly from Microsoft. Legacy devices remain unaffected and will defer to a local patch cache if one has been configured. For more details on these changes, refer to this Community post. IMPORTANT A maximum number of eight devices can be patched simultaneously by a local patch cache. The rest of the devices served by the patch cache will queue. Queuing and performance depends on the resources available to the patch cache, as well as on disk and local network speed. |
| PATCH APPROVAL | |
| Field | Description |
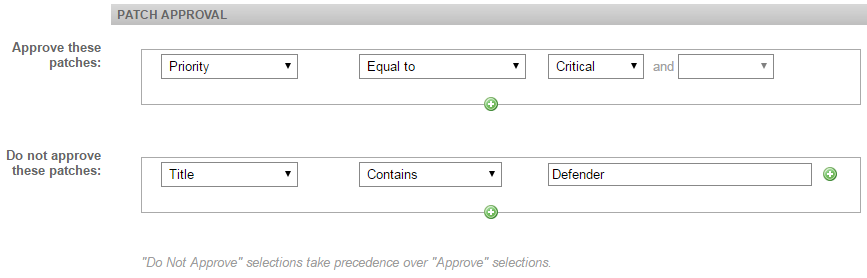
| Approve these patches | Allows you to configure approval filters. Refer to Filter patches. |
| Do not approve these patches | Allows you to configure disapproval filters, that is, you can set conditions that override your approval above. These filters take precedence over approval filters. Refer to Filter patches. EXAMPLE Configurations such as “Approve critical security patches, but do not approve critical security patches with ‘Defender’ in the title” are entirely possible. |
| Configure individual patches | You can use this section to manually override the patches that were approved or denied in the Approve these patches and Do not approve these patches sections above. The Configure individual patches section has three drop-down lists: Available, Approve, and Do Not Approve. The following options are available in each list: • Filter - You can filter by Microsoft Security Response Center Priorities (Critical, Important, Moderate, Low, Unspecified), May Require Reboot, and May Require User Input. For more information on Priority, refer to Filter patches. • Search - The search results are narrowed as you type. Use quotation marks to search for a whole string. For example, ".net framework 4.7" searches for patch titles containing .net framework 4.7, while searching for .net framework 4.7 without quotation marks searches for patch titles containing .net OR framework OR 4.7. Searches are not case sensitive. • Sort - You can sort the patches by clicking on any of the following columns: Title, Release date, Microsoft Security Response Center Priority, Download Size, Reboot behavior, User input. • Patch title - Click the hyperlink to open a page showing all devices across the entire account that are missing this patch / for which this patch has been approved / for which this patch has been denied (when clicking from the Available / Approve / Do Not Approve list, respectively). •  Click for more information - Click the icon to display further information about the patch. Click for more information - Click the icon to display further information about the patch.• Select - You can select your patches individually by checking the selection box in front of them. You can also select all of the patches listed by checking the Select All check box just in front of the Available / Approve / Do Not Approve drop-down. •  Export all patches to CSV - Allows you to export all patches of the respective list in .CSV format. It is not possible to select only certain patches for the export. Once you click on the Export all patches to CSV button, make sure to select/deselect the columns you want to include/exclude in the export. Export all patches to CSV - Allows you to export all patches of the respective list in .CSV format. It is not possible to select only certain patches for the export. Once you click on the Export all patches to CSV button, make sure to select/deselect the columns you want to include/exclude in the export.NOTE If you have just moved patches from the Available list to the Approve or Do Not Approve list and want to export the updated list to a .CSV file, make sure to save the changes first and then click on the Export all patches to CSV button. This will allow you to see the updated number of patches in each list's export. Other configuration options specific to each list are discussed below. |
| Available | |
| This drop-down lists all patches that have been submitted to the platform. The number of patches is displayed in brackets next to the list name. The patches are collected from the audit data of all of the devices in the entire account/site, that is, they are not filtered by the criteria defined in the approval and disapproval sections above. This section allows you to configure individual patches regardless of any previous filters. EXAMPLE For example, you can approve a patch here that would have been excluded through a disapproval filter above. Once you have selected the required patches, you can perform the following actions that will override the approval and disapproval filters defined above:•  Approve - Approving a patch will remove it from the Available list and place it in the Approve list. Approve - Approving a patch will remove it from the Available list and place it in the Approve list.•  Do Not Approve - It will remove the patch from the Available list and place it in the Do Not Approve list. Do Not Approve - It will remove the patch from the Available list and place it in the Do Not Approve list. |
|
| Approve | |
| This drop-down lists all patches that have been approved through the Available list. The number of patches is displayed in brackets next to the list name. The patches listed are not filtered by the criteria defined in the approval and disapproval sections above. This section allows you to configure individual patches regardless of any previous filters. You can perform the following action in this list: •  Remove from list - It will remove the patch from this list and push it into the Available list again, where it can be approved or disapproved by the filters above it. You can hover over a patch and click on this icon at the end of the row, or you can select one or more patches and click on this icon in the Actions bar. Remove from list - It will remove the patch from this list and push it into the Available list again, where it can be approved or disapproved by the filters above it. You can hover over a patch and click on this icon at the end of the row, or you can select one or more patches and click on this icon in the Actions bar. |
|
| Do Not Approve | |
| This drop-down lists all patches that have been denied through the Available list. The number of patches is displayed in brackets next to the list name. The patches listed are not filtered by the criteria defined in the approval and disapproval sections above. This section allows you to configure individual patches regardless of any previous filters. You can perform the following action in this list: • Remove from list - It will remove the patch from this list and push it into the Available list again, where it can be approved or disapproved by the filters above it. You can hover over a patch and click on this icon at the end of the row, or you can select one or more patches and click on this icon in the Actions bar. |
|
| POWER | |
| Field | Description |
| Boot | The following option is available: • Wake all targeted devices 10 minutes before policy is due to start - You must have a Network Node device in the same site as your targeted devices to use this feature. (Local Caches can also be nominated as Network Nodes.) If multiple Network Nodes are nominated, all will send requests. Be aware that Wake-on-LAN must be enabled in BIOS/EFI and typically only works for laptops when they have an active mains connection. For more information, refer to Wake-on-LAN and Nominate a device as a Network Node. |
| Reboot | The following options are available: • Power down devices after patch window has concluded - It will shut down the targeted devices after the patch schedule window. • Reboot devices, if required, once policy concludes - If necessary, it will reboot the targeted devices after the policy has run. Please note that the devices will reboot once all updates have been installed and not necessarily at the end of the policy window. • Permit rebooting if a USB Mass-Storage Device is connected at scheduled reboot time - This option becomes available if the "Reboot devices..." option has been selected. Do not select this option if you want to cancel reboots when USB sticks are inserted. This will stop servers from rebooting into a LiveUSB. NOTE You can always search for devices requiring a reboot using a Default Device Filter. Refer to Default Device Filter definitions. • Do not reboot devices after patch window has concluded - This option is selected by default. It will stop the targeted devices from rebooting after the patch schedule window.• But show Endpoint a branded reboot reminder every X hour/day - This option becomes available if the "Do not reboot devices..." option has been selected. It allows you to show a branded reboot reminder to the end user every 1-12 hours/1 day/2 days. The reminder will be displayed on the screen until the end user dismisses it. The reminder can be dismissed indefinitely. • Permit a maximum of X dismissals, after which time reminders will persist on screen - This option becomes available if the "But show Endpoint..." option has been selected. It lets you configure how many times (maximum two-digit integer) the end user is allowed to dismiss the reboot reminder, after which they will no longer be able to dismiss it. If this option is enabled but no value is set, then the default value of 1 will be used, that is, the end user will be able to dismiss the reminder only once and the second reminder will persist on the screen. The branding for the reminder is taken from the Patch Reboot Window image on the Branding page. Refer to Branding in the current UI and Branding - New UI in the New UI. |
-
Click Save and Push Changes.
If you click Save Only, you'll be directed to your list of policies where you can click Push changes... next to the policy in question.
NOTE If you click Save Only (current UI) or Save and Deploy Later (New UI) instead of Save and Push Changes (current UI) or Save and Deploy Now (New UI) when creating or updating a policy, the changes will still be deployed at midnight in your timezone because policies are automatically deployed every 24 hours.
Account-level patch policies can be overridden at the site level. This allows you to change settings at the site level without modifying the master (account-level) policy.
- Navigate to any of your sites and click on the Policies tab. You will be presented with both account and site policies.
- Locate your account-level patch management policy and click on the Override button, or on the Edit Override button if the patch policy in question already has an active override. An active override is also indicated by the Override active
 button in front of the policy.
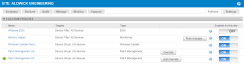

NOTE A patch management policy that is only active at the site level will not have an Override button (and any Override sections within the policy).
- This will open the patch management policy as configured at the account level, and you will have the following options:
| Field | Description |
|---|---|
| Name | These fields cannot be edited. NOTE The targets of the policy are inherited from the account-level policy. |
| Policy type | |
| Created | |
| Modified | |
| Targets | |
| TIMING OPTIONS | |
| Override | Turn it ON to be able to edit the settings below. If you turn it OFF again, the settings will revert. |
| Audit only | These sections become available as soon as the Override button is turned ON. For information on the configuration options, refer to TIMING OPTIONS. |
| Schedule | |
| Duration | |
| PATCH LOCATION | |
| Override | Turn it ON to be able to edit the settings below. If you turn it OFF again, the settings will revert. |
| Local Cache | This section becomes available as soon as the Override button is turned ON. For information on the configuration options, refer to PATCH LOCATION. |
| PATCH APPROVAL | |
| Add Rule | Turn it ON to be able to edit the settings below. If you turn it OFF again, the settings will revert. |
| Approve these patches | These sections become available as soon as the Add Rule button is turned ON. For information on the configuration options, refer to PATCH APPROVAL. |
| Do not approve these patches | |
| Configure individual patches | |
| POWER | |
| Override | Turn it ON to be able to edit the settings below. If you turn it OFF again, the settings will revert. |
| Boot | These sections become available as soon as the Override button is turned ON. For information on the configuration options, refer to POWER. |
| Reboot | |
-
Click Save and Push Changes.
If you click Save Only, you'll be directed to your list of policies where you can click Push changes... next to the policy in question.
NOTE If you click Save Only (current UI) or Save and Deploy Later (New UI) instead of Save and Push Changes (current UI) or Save and Deploy Now (New UI) when creating or updating a policy, the changes will still be deployed at midnight in your timezone because policies are automatically deployed every 24 hours.
NOTE You can also configure individual patch installations at the device level, permitting exclusions or tolerances for individual patches. Refer to Patch management at the device level.
Your patch management policy can use filtering criteria to determine the patches that should be installed on the targeted devices.
You can filter by the following criteria:
| Field | Description |
|---|---|
| All | This selection will include all patches. |
| Category | Select any of the following categories: • Applications - Releases relating to specific applications that receive updates via Windows Update. • Connectors - Software that helps establish links between endpoints and a server running Windows Server software. • Critical Updates - Non-security-related updates that help maintain the operation of a system. • Definition Updates - Updates for Windows Defender malware definitions. These are disabled when the endpoint is using alternative antivirus software. • Drivers - Driver updates to ensure Windows can communicate properly with the hardware connected to it. • Feature Packs - Packs designed to unify Windows versions' functionalities outside of full service pack releases. • Security Updates - Updates that help maintain the security and safety of a system. These should be installed as soon as possible. • Service Packs - A collection of individual updates for issues reported both internally and from Microsoft customers. • Tools - Utilities or features that help to complete a task or set of tasks. • Update Rollups - A collection of individual updates designed to target a specific element (e.g. security) of Windows. • Updates - Updates that are neither critical nor security related, but which deliver a fix for a reported issue. Use any of the following qualifiers: Contains, Does not contain, Is empty, Is not empty, Begins with, Does not begin with, Ends with, Does not end with. |
| Description | Allows you to filter by the description of the patch. Use any of the following qualifiers: Contains, Does not contain, Is empty, Is not empty, Begins with, Does not begin with, Ends with, Does not end with, Equals, Does not equal. |
| Download size | You can limit the download size of the patch to a certain number of gigabytes, megabytes, kilobytes, or exact number of bytes. Use any of the following qualifiers: Less than, Less or equal, Equal to, Greater or equal, Greater than, Between. |
| KB number | Allows you to search for a specific Microsoft Knowledge Base article number the patch is associated with. Use any of the following qualifiers: Contains, Does not contain, Is empty, Is not empty, Begins with, Does not begin with, Ends with, Does not end with, Equals, Does not equal. |
| Priority (Microsoft Security Response Center Priority) | Allows you to filter by Microsoft Security Response Center Priority as specified in Microsoft Security Bulletins. Select any one of Critical, Important, Moderate, Low, Unspecified. Use any of the following qualifiers: Less than, Less or equal, Equal to, Greater or equal, Greater than, Between. IMPORTANT Datto RMM patch management policies reference Security Bulletin classifications, not the severity specified by Windows Update. Refer to About Microsoft Update classifications. |
| Reboot behavior | Select from Never reboots (0), Always requires reboot (1), and Can request reboot (2). It allows you to avoid pushing changes that require a reboot during business hours. Use any of the following qualifiers: Less than, Less or equal, Equal to, Greater or equal, Greater than, Between. |
| Release date | Allows you to filter for patches released before or after a certain date, or older than 7, 14, 30, 60, or 90 days. |
| Request user input | Select either May require, or Does not require. NOTE If you filter for patches that may require user input, schedule them to install during business hours. |
| Title | Allows you to filter by the name of the patch. Use any of the following qualifiers: Contains, Does not contain, Is empty, Is not empty, Begins with, Does not begin with, Ends with, Does not end with, Equals, Does not equal. |
| Type | Allows you to filter by patch type. Select either Software or Driver. |
To filter by multiple criteria:
- Click the plus sign
 below a criterion.
 - Select the OR or AND operator.
NOTE If both conditions must be true for the patch to be included in the search results, select AND. If either one must be true, select OR.
NOTE When you add additional criteria, you cannot combine AND and OR. The selection you made first is repeated for any subsequent criterion.
- Select the next criterion.
- Click the minus sign
 to remove any of the criteria.
To group queries within a criterion:
- Click the plus sign next to a criterion.
- Select the OR or AND operator.
NOTE Standard SQL dictates that grouped queries on a positive criterion (e.g. "Title contains 1", "Title contains 2", "Title contains 3") need to be grouped with OR. For example, "Title contains 1 OR 2 OR 3" will return patches whose title contains either 1 or 2 or 3.
Negative queries (e.g. "Title does not contain 1", "Title does not contain 2", "Title does not contain 3") need to be grouped with AND. For example, "Title does not contain 1 AND 2 AND 3" will only return patches whose title contains neither 1 nor 2 or 3.
NOTE When you add additional queries, you cannot combine AND and OR. The selection you made first is repeated for the subsequent queries.
- Select the next criterion.
- Click the minus sign to remove any of the criteria.
Set up a patch monitor to get an alert when a device fails to install any patches as part of a Datto RMM patch management policy. Refer to Patch Monitor in the current UI and Patch monitor in the New UI.
Notes
Microsoft uses two different security classification systems for their knowledge base articles.
Windows Update references a KB number and an update type: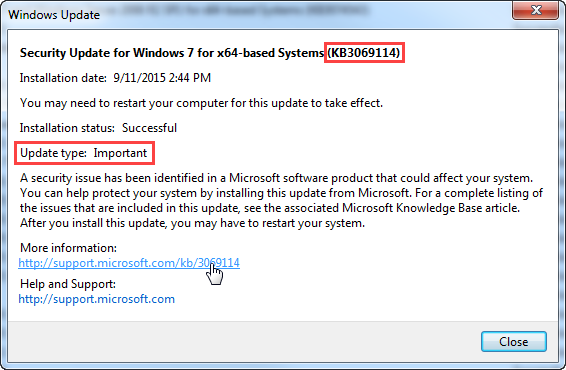
When you click the link for more information from within Windows Update, an article opens up that references a Microsoft Security Bulletin number: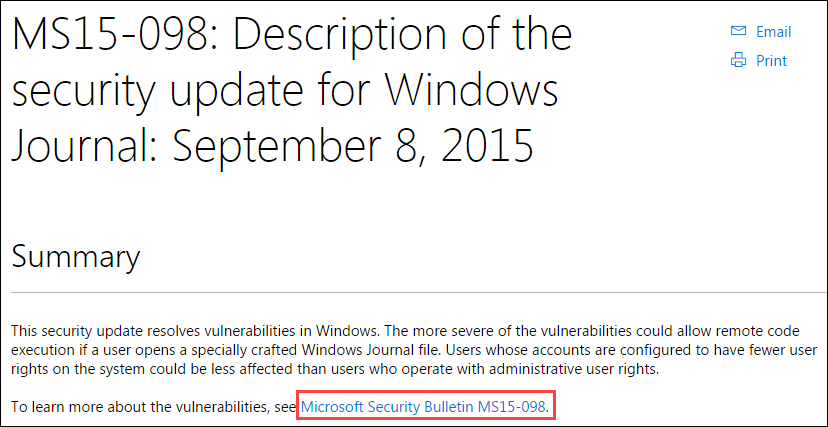
When you click on that link, a page in the Security TechCenter opens and displays the Microsoft Security Response Center Priority:
IMPORTANT The update type in Windows Update is shown as Important, but on the Security Bulletin, it is shown as Critical. Datto RMM uses the Security Bulletin classifications (Microsoft Security Response Center Priority) from the Security TechCenter library, not the update types from Windows Update.
Patches are prioritized the following way:
| Criterion | Order |
|---|---|
| Category | 1. Security Updates |
| 2. Service Packs | |
| 3. Update Rollups | |
| 4. Critical Updates | |
| 5. Updates | |
| 6. Any remaining patches | |
| Microsoft Security Response Center Priority | 1. Critical |
| 2. Important | |
| 3. Moderate | |
| 4. Low | |
| 5. Unspecified | |
| Release date of the patch | Most recent first, descending |
Based on the above prioritization, patches are installed in the following order:
| Order | Category | Microsoft Security Response Center Priority | Release date of the patch |
|---|---|---|---|
| 1 | Security Updates | Critical | Most recent first, descending |
| 2 | Security Updates | Important | Most recent first, descending |
| 3 | Security Updates | Moderate | Most recent first, descending |
| 4 | Security Updates | Low | Most recent first, descending |
| 5 | Security Updates | Unspecified | Most recent first, descending |
| 6 | Service Packs | N/A | Most recent first, descending |
| 7 | Update Rollups | N/A | Most recent first, descending |
| 8 | Critical Updates | N/A | Most recent first, descending |
| 9 | Updates | N/A | Most recent first, descending |
| 10 | Any remaining patches | N/A | N/A (all remaining patches are treated as equal) |
We have identified a peculiarity involving Microsoft’s handling of patching which results in endpoints displaying the following error when they have installed patches via a local cache (and not sourced them directly from Microsoft):
This error only appears when endpoints access the Windows Update section of the Settings menu, which should no longer be a necessary step as updates are delivered automatically without needing the involvement of Microsoft’s own patch management routines.
We have sourced the issue to the particular method we use to place patches in the update cache directory of Windows. While thoroughly tested and 100% functional in all cases, it triggers this issue. The error is meaningless, and can be dismissed without concern. Re-checking for updates will clear it from this interface. Patches that trigger this error will have been installed without issue.
Until Microsoft fix this issue, the error will be shown when endpoints look for it. We apologize for any inconvenience this may cause.
Updates for Windows 10 devices must be handled differently from the operating systems that came before it. For more information, refer to Patch Management and Windows 10.


