Jobs overview - New UI
SECURITY Refer to JOBS in Security Level Details - Permissions
NAVIGATION New UI > Automation > Jobs
About
The Jobs page displays information about all of your jobs.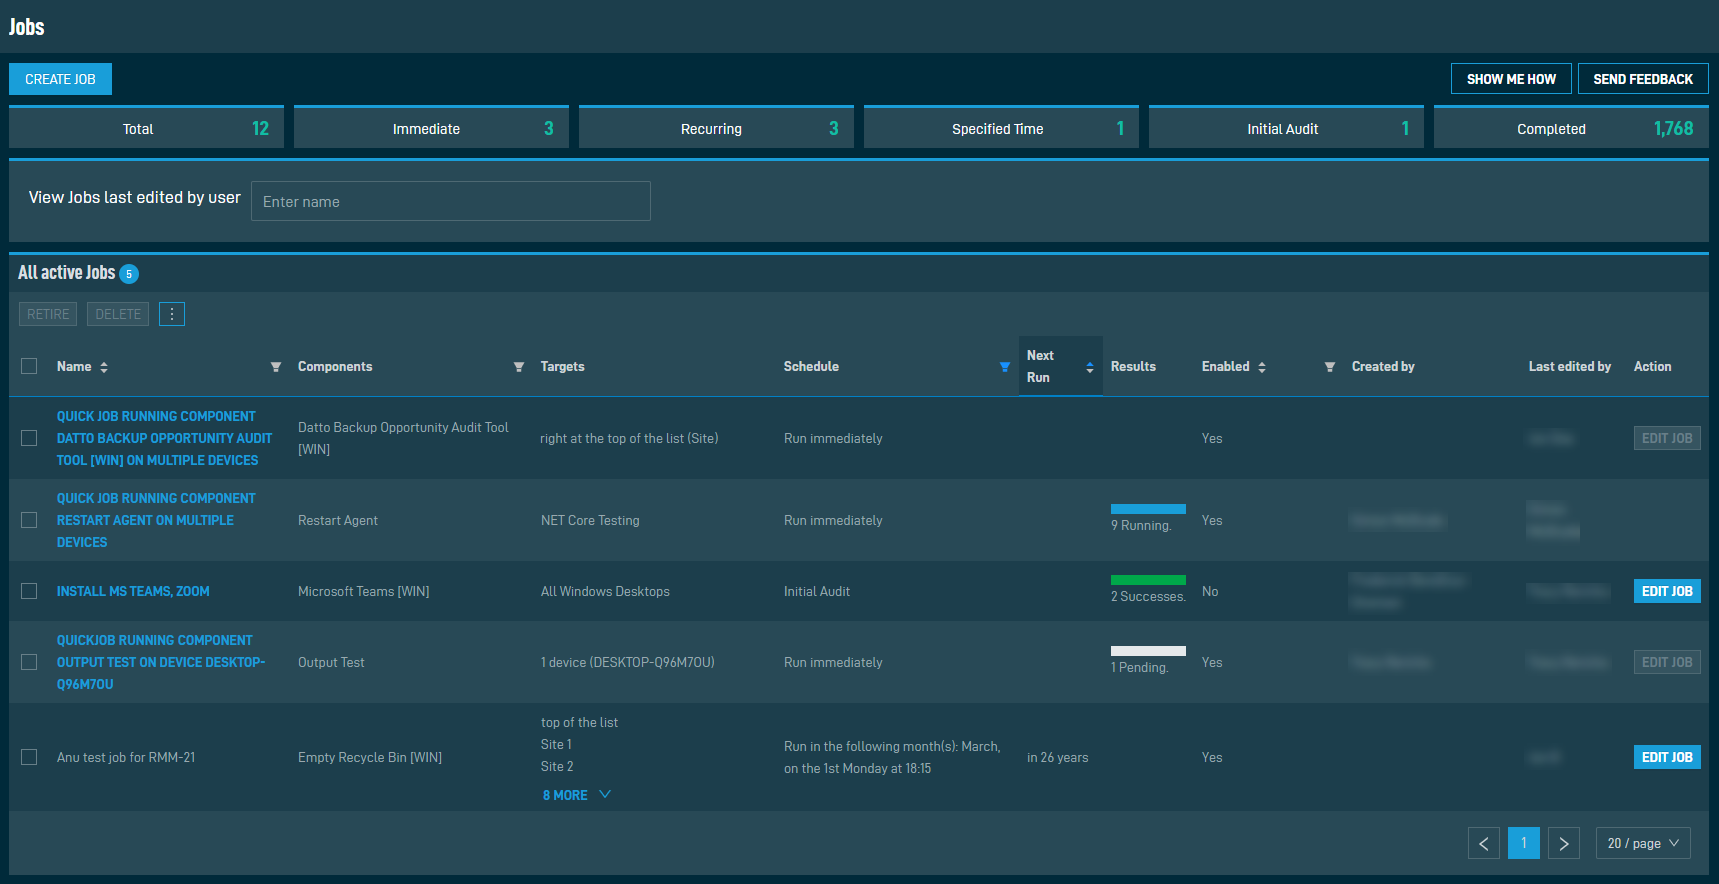
You can create a new job by clicking the Create Job action button displayed at the top of the page. Refer to Creating a job.
At the top of the page, jobs are sorted into categories. All categories list active jobs except for the Completed category. The categories are as follows:
| Category | Description |
|---|---|
| Total | The total number of jobs. |
| Immediate | Jobs run as soon as they were created. |
| Recurring | Jobs scheduled to run every time at the selected date and time. |
| Specified Time | Jobs scheduled to run once at the selected date and time. |
| Initial Audit | Jobs run on devices with audit data matching the target requirements. |
| Completed | Jobs that have completed running, including retired jobs. |
Click a job in the list to go to the Job Details page. Refer to Job details - New UI.
Enter a name to filter on all jobs edited by the selected user (the search results are narrowed as you type), then select the name from the list. Your name is automatically filled in by default when you navigate to this page.
The selection box allows you to select one or more jobs. Select all jobs shown by checking the selection box in the table header. Once you have made your selections, choose from the following options. To access all options, click the Row Actions icon at the end of the row.
| Action Button | Description |
|---|---|
|
Retire |
Refer to Action buttons. |
|
Delete |
Refer to Action buttons. |
| Export Selected Rows to CSV | In the confirmation dialog box, select whether to show table headers in the file by toggling the Show table headers in the exported CSV button. Select OK to download the file. Any column selections or filters that have been applied to the table will also be applied in the CSV file. A maximum number of 500 rows can be exported to a single CSV file. The Export All (Max. 500) Rows to CSV action is available without selecting any row in the table.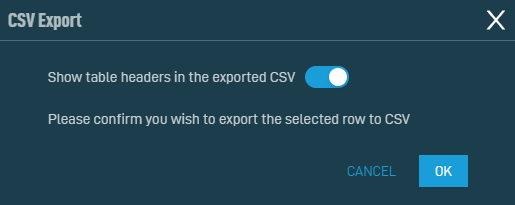 |
| Export All (Max. 500) Rows to CSV | |
| Uncheck All | Deselects all selected rows. The number of selected rows is indicated in parentheses and next to the Row Actions icon. |
At the bottom of the page, the jobs table displays the following columns:
| Field | Sortable? | Description |
|---|---|---|
| Name |

|
The name of the job. To narrow the list, click the Filter Menu icon, enter a term, and click Search. To see the full list, click Reset. Click the job name to go to the Job Details page. Refer to Job details - New UI. |
| Components | A list of the components included in this job. Refer to Components. To narrow the list, click the Filter Menu icon, enter a term, and click Search. To see the full list, click Reset. | |
| Targets | A list of targets this job will run against. Refer to Targets. | |
| Schedule | The schedule for this job. Refer to Schedule. Click the Filter Menu icon and choose from one of the following to filter by job schedule: Immediate, At selected date and time, Initial Audit, Daily, Weekly, Monthly, Monthly day of week, or On Connect. | |
| Next Run |
|
The next time this job is scheduled to run. |
| Results | The results of the components this job is scheduled to run. Refer to Job Status. | |
| Enabled |
|
Whether the job is enabled or disabled. Refer to Enabled/Disabled. Click the Filter Menu icon and click Yes or No to filter by the status of the jobs. To see the full list, click All. |
| Created by | The user who created this job. | |
| Last edited by | The user who last edited this job, as well as how long ago the job was edited. | |
| Action | Click Edit Job to modify the job. Refer to Editing a job. |
The number of results displayed can be specified by selecting the desired number from the drop-down menu at the bottom of the table. This selection will persist the next time the page is accessed.


