Datto File Protection Integration
SECURITY Administrator
NAVIGATION ComStore tab
NAVIGATION Account > Policies
NAVIGATION Sites > select a site > Policies
About Datto File Protection
Datto File Protection is Datto's cloud-based file backup service. It consists of the following components:
- File Protection Agent: an application installed on a computer that is responsible for securely transmitting data between the device on which it is installed and the File Protection service. The Datto File Protection Agent has the ability to silently install the Agent on a user’s machine via an RMM tool, such as Datto RMM.
- File Protection Online: a web interface that provides end users with access to device-related functions in the File Protection service, like restoring devices from a backup.
- File Protection Manager: a web interface that provides access to all administrative and provisioning functions for partners.
For more detailed information about Datto File Protection, please visit the Datto File Protection Manager Help.
About the Datto File Protection Integration
The integration offers the following major benefits:
- Seamless, silent deployment and removal of Datto File Protection using Datto RMM. The Datto File Protection team key allows you to install or uninstall the Datto File Protection Agent without end user interaction. The installation and uninstallation of the Agent can be performed using the same component. Refer to Install the Datto File Protection Agent.
- Alerting on key problems of Datto File Protection, like devices not running backups for days. Tickets can also be created from the alerts in Autotask PSA if the ticket integration is enabled. Refer to Configure ticket integration.
- Visibility on Datto File Protection status in Datto RMM. Any managed device will display the Datto File Protection status, backup size, and last backup day. You can use this information in reports or filters. Moreover, if you use the Autotask PSA Integration and the user-defined field synchronization is enabled, the Datto File Protection information will be synced to your Autotask PSA configuration items. Refer to Configure device synchronization.
Prerequisite
You will need to have a team key to be able to associate your device(s) with the correct team. Refer to Install the Datto File Protection Agent.
How to...
To set up the integration, you first need to download the Datto File Protection component (Datto File Protection [WIN] / Datto File Protection Server [WIN] / Datto File Protection Desktop [MAC]). To monitor Datto File Protection on Windows devices, you need to download the Datto File Protection & Server Monitor [WIN] component.
NOTE The Datto File Protection [WIN] or [MAC] components can also be used to uninstall the File Protection Agent. Refer to Install the Datto File Protection Agent.
- Log in to your Datto RMM account and click the ComStore tab.
- Search for Datto File Protection.
- Open either the Windows or Mac version of the Datto File Protection component, and click Add to my Component Library to download it.
Repeat the same with the Datto File Protection & Server Monitor [WIN] component. - Open your Component Library by clicking on the Components tab.
- Locate the Datto File Protection component and mark it as a favorite by clicking on the Toggle favorite icon
 . This will allow you to run this component as a quick job in the current UI. For more information, refer to Make a component available for quick jobs.
Before deploying the Datto File Protection Agent, a team key must be created in the Datto File Protection Manager. The team key is used during the installation of the Agent to associate the device with the correct team, and it also assigns a set of default folders for the backup. For information on how to create or find the Datto File Protection team key, refer to this topic in the Datto File Protection Manager Help: Deployment Configuration.
To install the Datto File Protection Agent via Datto RMM, follow these steps:
- Click the Sites tab and open one of your sites.
- Click the Devices tab and select one or more of your devices.
- Click the Run a quick job icon
 in the action bar. A window with all components available for quick jobs will open.
 - Select the Datto File Protection component.

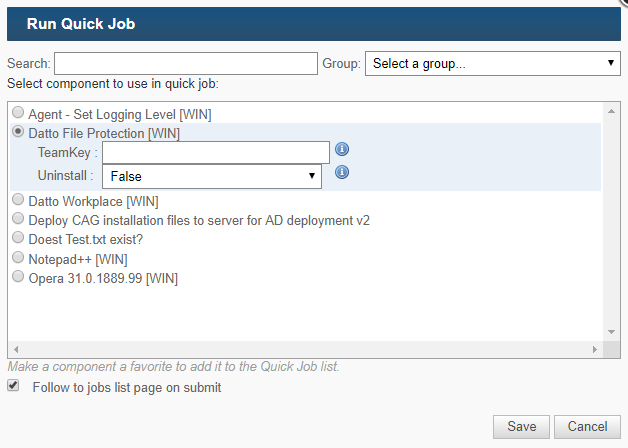
- In the Uninstall field, False is selected by default. Keep this selection for the Datto File Protection Agent installation.
NOTE Setting the Uninstall field to True would trigger the Datto File Protection Agent uninstallation process. Uninstalling does not require a team key.
- Enter the team key obtained from the Datto File Protection Manager in the TeamKey field.
NOTE If you leave this field blank, the end user will be prompted to enter a team key when they launch the application to finish the installation process.
NOTE You can also add TeamKey as a variable to your Datto RMM account and will be used in the back end when running the job. Refer to the Variables and Update Site Variables sections in Account Settings and Site Settings.
- Click Save. This will install the Datto File Protection Agent on the selected devices.
- The installation may take a few minutes. Once it's completed, you can check the output of the installation by clicking on the Stdout icon
 . Refer to The job view.
NOTE The installation is completely silent; however, users are required to log off and log back in to their device or reboot it for Datto File Protection to start automatically. Users can start Datto File Protection manually as well.
To be able to monitor the Datto File Protection status of your device(s), you can create a component monitor and apply it at the device level or at the account or the site level as part of a Monitoring policy.
- If you want to create the monitor at the device level, navigate to your Device > Monitor > Monitors radio button.
If you want to add the monitor to a Monitoring policy either at the account or the site level, follow the instructions outlined in the Specify the policy details for a monitoring policy and the Add a target sections of this topic: Create a Monitoring policy. - Click Add a monitor....
- Select Component Monitor as Monitor Type and click Next.
- In the Trigger Details area, select Datto File Protection & Server Monitor [WIN] from the drop-down list. As soon as it's selected, you'll be presented with a number of variables:
| Field | Description |
|---|---|
| usrShowBackupWarnings | Toggle whether to send Datto RMM alerts in response to active backup warnings. |
| usrMonitorLastBackupDate | Toggle whether to report if the date of the last successful backup exceeds the date given in usrDaysToCheck. |
| usrShowServiceStatus | Toggle whether to report on Agent offline status. |
| usrDaysToCheck | Specify how far back (in days) to report backup information for. |
| usrShowInstallStatus | Toggle whether to report on the Datto File Protection Agent's installation status. |
| usrUDF2 | Shows the Datto File Protection version and the Device ID, which will allow you to quickly find the device in the Datto File Protection Manager. By default, Custom5 is used. Enter one of Custom1, Custom2, ... Custom10, according to the user-defined field you wish to populate. EXAMPLE Custom1 will populate User-Defined Field 1, Custom2 will populate User-Defined Field 2, and so on. |
| usrUDF1 | Shows the status, size of backup, and when the last backup was completed. By default, Custom4 is used. Enter one of Custom1, Custom2, ... Custom10, according to the user-defined field you wish to populate. EXAMPLE Custom1 will populate User-Defined Field 1, Custom2 will populate User-Defined Field 2, and so on. |
| And executed every... | Specify when the component monitor should be run. NOTE We recommend that you set this interval to at least 1 hour. |
- Refer to Create a monitor in the current UI to configure the Alert Details, Auto-Resolution Details, Response Details, and Ticket Details of the monitor, or refer to Creating a monitor in the New UI.
- If you have created the monitor at the device level, it will be added to the list of monitors of that device.
If you have created a monitoring policy, you need to save and apply the changes. Refer to Save the policy and push the changes. - The targeted devices will now be monitored. You'll be alerted according to the monitor configuration, and the UDF information will be displayed on the Device Summary page.
By default, the integration uses User-Defined Fields 4 and 5 to show the status of Datto File Protection on the Device Summary page in Datto RMM. We recommend that you rename these user-defined field names in Account Settings to reflect what information is captured through the integration. To learn how to change the field names, refer to the User-Defined Fields section in Account Settings.
EXAMPLE You can, for example, rename the Account Label of User-Defined Field 4 to DFP Status, and that of User-Defined Field 5 to DFP Version | ID. This would result in a similar screenshot of the Device Summary page:


