Create a Mobile Device Management policy
IMPORTANT The Mobile Device Management (MDM) feature is no longer available for new implementations. MDM-related documentation in the Datto RMM Help only applies to partners who are already using this feature; however, Datto no longer offers support for issues with MDM. Please note that if the Mobile Device Management component is deleted from your Component Library, you will not be able to download it from the ComStore again. For further information regarding this change, please refer to this Community post.
SECURITY Permission to manage policies at the account and/or site level
NAVIGATION Account > Policies
NAVIGATION Sites > select a site > Policies
What is a Mobile Device Management policy?
Mobile Device Management (MDM) policies allow you to configure a number of settings and push them over the air to the targeted mobile devices.
NOTE Only one MDM policy can target a device at any one time.
The following settings can be configured:
- Passcode rules
- Restrictions
- VPN setup
- WiFi credentials
NOTE MDM policies can be created at the account or site level. However, since VPN and WiFi credentials are customer-specific, you would typically set up an MDM policy at the site level. Refer to Create a policy.
How to...
- On the Account > Policies or Site > Policies page, click New account policy... or New site policy...
- Give the policy a Name.
- Select the type Mobile Device Management.
-
To copy an already existing policy to use it as a template, choose it from the Based on drop-down list. To create a new policy, select New Policy.
- Click Next.
- Complete the following fields:
| Field | Description |
|---|---|
| Removal policy | By default, Allow users to remove this policy is selected. Click the drop-down and select Require password to remove this policy and enter a Password. |
| Targets | MDM policies target all mobiles by default. You cannot enter multiple targets or use groups and filters, because there can only be one MDM policy per device. If there are multiple policies enabled (for example, at the account and site level), only one policy will take effect on the device. |
- In the Mobile Settings section, click Add a setting....
The Add a Mobile Setting window will open.
- Select a mobile setting type: Passcode, Restrictions, VPN, Wifi.
- Click Next.
- Depending on the setting type, complete the following fields:
Passcode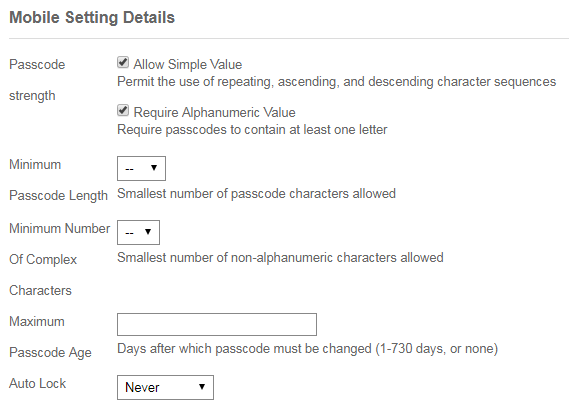 |
|
|---|---|
| Field | Description |
| Passcode strength | If Allow Simple Value is checked, the use of repeating, ascending, and descending character sequences is permitted. If Require Alphanumeric Value is checked, passcodes must contain at least one letter. |
| Minimum Passcode Length | Smallest number of passcode characters allowed. |
| Minimum Number Of Complex Character | Smallest number of non-alphanumeric characters allowed. |
| Maximum Passcode Age | Days after which passcode must be changed (1-730 days, or none). |
| Auto Lock | Maximum allowed auto-lock value. Supported values: 2/5/10/15 minutes or never for iPads, 1-5 minutes or never for iPhones. If you seek to target both iPhones and iPads, select a value of 2 or 5 minutes. |
| Passcode History | Number of unique passcodes before they can be reused (1-50, or none). |
| Maximum Number Of Failed Attempts | Number of passcode entry attempts allowed before all data on device will be erased. |
| Restrictions | |
| Field | Description |
| Restrictions, Application Access, iCloud Services, Security and Privacy, Content Ratings, iOS Supervised Restrictions | To apply or remove a setting, check or clear the check box. For a detailed list of the settings, refer to Features of Windows, macOS, Linux, and mobile device Agents. |
VPN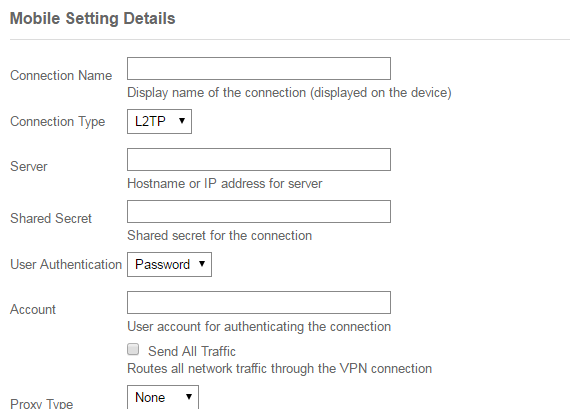 |
|
| Field | Description |
| Connection Name | Display name of the connection (displayed on the device). |
| Connection Type | Click the drop-down and select Layer 2 Tunneling Protocol (L2TP ), Point-to-Point Tunneling Protocol (PPTP ) or Internet Protocol Security (IPSec). |
| Server | Hostname or IP address for server. |
| Shared Secret | Some companies require the use of an additional security field. Enter the Shared Secret for the connection. |
| User Authentication | Select whether the user can authenticate using a password or must use RSA Two-factor Authentication. |
| Account | Enter the username required to authenticate to the VPN. |
| Send all traffic | When this check box is selected, all network traffic is routed through the VPN connection. |
| Proxy Type | If your organization uses a proxy server, select the appropriate type. |
Wifi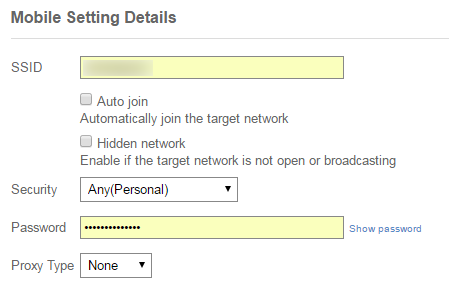 |
|
| Field | Description |
| SSID | Enter the name of the wireless network you want to join. |
| Auto join | Check to have the device automatically join the target network. |
| Hidden network | Enable if the target network is not open or broadcasting. The network will then be listed under Hidden Networks. |
| Security | Select the type of encryption that is being used on the network: Any (Personal), WEP (Personal), WPA/WPA2 (Personal), or None. |
| Password | Enter a password. |
| Proxy Type | If your organization uses a proxy server, select the appropriate type. Choose from None, Manual, or Auto. |
| Proxy URL (Auto) | If you select Auto, the proxy settings will be stored in a Proxy URL. Enter the URL. |
| Server and Port (Manual) | If the Proxy Type is manual, enter the hostname or IP address and the Port number. |
| Authentication (Manual) | Enter the username required to authenticate against the proxy server |
| Password (Manual) | Enter the password. |
- Click Submit. The setting type is added to the list of mobile settings. To add another setting, repeat the process.
-
Click Save and Push Changes.
If you click Save Only, you'll be directed to your list of policies where you can click Push changes... next to the policy in question.
NOTE The MDM policy will initially be disabled on the policy list page. Turning on an MDM policy automatically turns off any other that is enabled. This is to make sure that it only ever happens as part of a conscious decision on your part, rather than, for example, when creating a new policy just to view some of the settings. To avoid confusion over which policy takes precedence for a site, MDM policies must be explicitly turned on once created.
NOTE Devices of Unknown device type will not be targeted by the policy.
NOTE If you click Save Only (current UI) or Save and Deploy Later (New UI) instead of Save and Push Changes (current UI) or Save and Deploy Now (New UI) when creating or updating a policy, the changes will still be deployed at midnight in your timezone because policies are automatically deployed every 24 hours.
- Navigate to the Policies tab.
- Toggle the Enabled for this site setting to OFF.


